
Finding the gold under a sky of grey can be a difficult task, Simon Thomas from 2 Ride the World explains how to get the most from your camera in overcast conditions.
So, your camera’s stuffed into your travel bag because you think that dull days produce dull photos? Think again! Believe it or not, grey is your friend. No matter how expensive the camera, it’s never going to be able to see or capture all the information your eyes can.
Strangely enough on super bright days, yes, the ones that you thought were ideal for taking cool biker action shots, your camera is going to struggle. Bright days mean high contrast. This is when your camera has to guess whether you want all the detail in the bright areas of the image (sky, high gloss areas of the bikes, shiny asphalt) or the detail in the dark (engine in shadow, looming mountains etc.). The bottom line is that it can’t capture both. Shooting in duller conditions means that your camera can capture more photographic data (detail).
Camera set-up
We all want to capture sharp images, which means we want to freeze the moment. For that we want as much light to enter through the lens as possible. Set your camera to aperture mode. This is usually denoted by the letter ‘A’ on a dial or a button.
Now go ahead and set your lens to f2.8, f4 or f5.6. Don’t worry, even though your now controlling how wide the aperture on your lens is the cameras still going to do all the other stuff to make sure your images turn out great.
What the f? Stop!
If you’re wondering what those f numbers on your lens are, well, the smaller the number you select, the wider the diaphragm on your lens will open. Think of the lens like the pupil of your eye. Your pupil narrows when it’s bright and widens when it’s darker. So, in low light condition we need the diaphragm of the lens to open wider to let in more light.
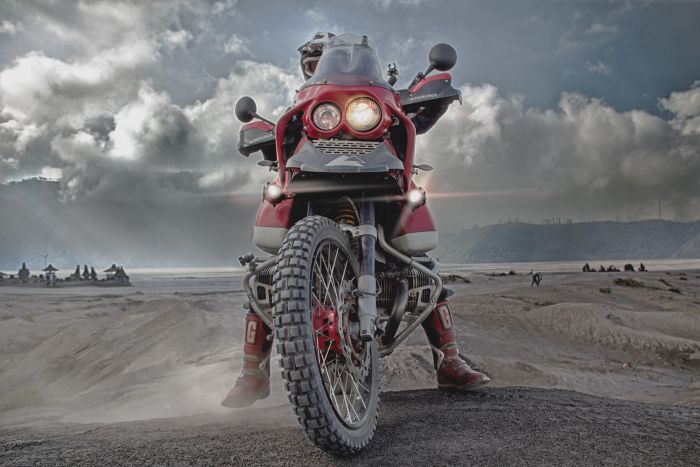
Before
It’s not the self-destruct button!
Next, find the button that reads ISO, yeah the one that you thought was the ‘self-destruct button’ that you’ve never touched. Increase the ISO to around 400-600. Increasing your ISO level can be crucial in low light conditions. The ISO controls how sensitive your cameras sensor is to light.
The higher the level, the more sensitive it becomes allowing for us to take a faster exposure. Remember the faster the exposure the more we’re able to freeze the moment. This is especially important if you’re photographing moving objects like motorcycles when we don’t want the subject to look blurry.
Tip: There is a price to be paid for increasing your cameras ISO level. The higher you dial in the ISO level the more you increase the chances of digital noise being introduced into your image.
Between a rock and ‘any’ hard place
If you have a tripod now’s the time to pull it out and put it to work. Adjust your tripod so that you can still pan (swivel) the camera. On dull or low light days we want to minimize the chance of blurring in your photos.
With your camera on a tripod, stabilized on a small bean bag or even just lodged against something solid, we’re removing camera movement from the equation and increasing your chances of capturing the moment perfectly.
If there’s no way to stabilize your camera, make sure that ‘VR’ (vibration reduction) is turned on. This will minimize blurring caused by camera shake.
After
In-built camera profiles
Now, if your camera has profiles (most cameras do these days) select a profile that reads, ‘vivid’ or ‘high contrast’. Different camera manufacturers use differing names for these profiles, so yes, you might have to do the unthinkable and read the manual or look it up on YouTube. Selecting one of these profiles allows your camera to make several changes to how it produces your photographs.
1. They’ll add more contrast to the image, ensuring your image has some visual wallop.
2. The sharpening of the image will be increased in images taken in these profiles.
3. A little extra saturation (colour) will be added to images taken in these profiles.
Put these three changes together and I guarantee your images aren’t going to dull.
The final touches
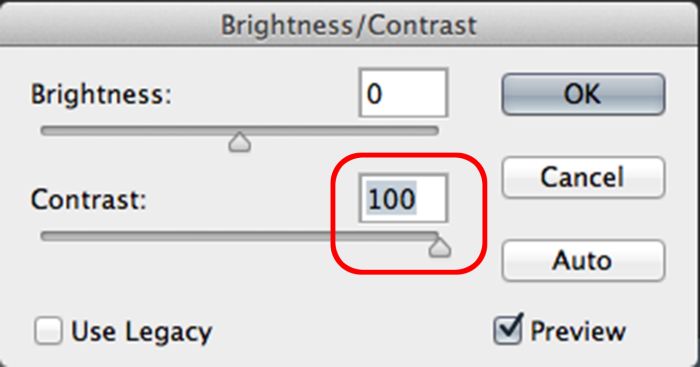
Almost every published image you see these days has had some minor adjustments. Why shouldn’t your travel shots get some extra TLC? Although your photo has some great detail, we still want to make sure it doesn’t look dull. In this example I’ll be using Adobe Photoshop, but almost any purchased or free image-editing program will offer a ‘contrast adjustment’ feature.
So, open the images you want to adjust the contrast on. Go under the image menu and choose ‘adjustments’, then choose ‘brightness/contrast’. In the grey dialogue box that appears, move the contrast slider to the left (TIP: make sure the preview box is checked).
If moving the slider all the way to the left provides too much contrast just back it off until you’re happy with your image. Next, select ‘save as’ and save your image with a new name to your preferred location and you’re done.
Tip: If your camera has the option to shoot in RAW mode then select it. Raw images are exactly what your camera saw through the lens whereas JPG images are essentially a compressed watered down version of what the camera saw. Sure, the images are smaller but to make something smaller you have lose something and what you’ll lose is detail, colour depth and impact.