
Simon Thomas explains how shooting in the correct file format can help you capture the raw beauty of THE world in your travel photography
I sipped on a hot coffee as I thought about what photographic wisdom to impart in this issue of ABR. I know I’ve missed telling you something simple but crucial, I thought. Then it hit me. File formats and what to shoot in. I know, not as exciting as a shampoo head massage from a supermodel but the info in this article is a game-changer.
Before we get into the nitty-gritty of file types, now’s a good opportunity to recap the basics. For photographers, and yes that includes you, there are three main file formats. JPG, TIFF and RAW. This is true whether you’re shooting on a stunningly expensive DSLR or your iPhone.

The primary difference between these formats is whether they are compressed or not. Files that are compressed like JPGs are referred to as ‘lossy’. Formats that are uncompressed, such as TIFF or RAW are generally referred to as ‘lossless’. Pretty simple so far, right? If you’re mingling with the photo crowd and you want to sound like you know what you’re talking about, you can refer to RAW files as digital negatives. We’ll get to this in a bit.
Stuffing your card
So, what’s the big deal? The most popular image format on the planet is JPG which you’ll see everywhere, from the images on your favourite website, to the photo files your phone produces. Take a second to read the last few letters at the end of the file name of your favourite image of your bike on your phone and you’ll most likely see .JPG on the screen.
The two main advantages to setting up your camera to shoot in JPG mode are, firstly, you can easily and quickly share your photos with friends and family as JPGs can be read by almost every electronic device on the planet, irrespective of style or brand. The other advantage is that, because the images are compressed, you can literally stuff hundreds if not thousands of images onto your camera’s memory card. Great right?
The dark side of JPGs
Yes, there is a downside to using JPGs and it’s a big one. The JPG format is lossy and, in order to compress the image file to a smaller size, your camera has to dump image data and then compress what is left. Let me explain. Your average 22MP (megapixel) camera records around 28MB (megabytes) of data for each photo. If you’ve selected the JPG option in your camera’s file format menu, your camera will produce JPG files that are approximately 7MB in size.
So, where did the other 21MB of data go? When your camera converts and compresses your image to a JPG file, it throws away image data never to be seen again. Fundamentally, you’re getting a watered-down version of what your camera actually saw. To make the image file smaller, you lose colour data, detail data, and contrast data, hence you’re only seeing a fraction of what your camera is really able to produce. To my mind, this is a fool’s economy and undermines all the legitimate reasons you probably upgraded to a better camera or phone in the first place.
|
|
|

It’s a bit like a Ducati, really…
Think of it in terms of a motorcycle. Your 22MP camera is a brand Ducati Multistrada 1260 S, capable of 150mph. Selecting JPG only mode is like riding your Ducati in first gear only, on cheap fuel, using re-tread tyres. Seriously, why would you? To make matters worse, JPG files are substantially less editable than RAW files, so if you’re thinking about post processing or enhancing your favourite photo because Adventure Bike Rider’s editor wants it as the next cover shot, you are going to struggle.
RAW files are bigger. There it is, but with memory cards and external hard drives being cheaper today than they ever have been, the extra size really isn’t a big deal. If you’re a pro or simply want to produce the best image possible, then RAW is the file format to select. The RAW file is effectively all the data and colour your camera saw and captured when you pressed the shutter release button. All the extra data in the image means you can post-process, using programs like Photoshop or my favourite LUMINAR4, and if you want to print the image, you can print it at A3 size or bigger.
Size matters
The superior quality, detail and flexibility of RAW files is why they are often referred to a ‘digital negatives’. They hold and show all the detail, depth, drama, and colour that your camera’s sensor actually recorded. It’s important to keep in mind that RAW files are proprietary and each camera brand uses a different RAW format. But manufacturers supply software with your camera so you can view the RAW files and even convert them to JPG or TIFF files to share with your friends or family. FYI, TIFF files can be easily read just like JPG files by most electronic devices but they are uncompressed and very large.
The great news is that most modern digital cameras will shoot and record both RAW and JPG simultaneously. So, you don’t have to choose just one format at the expense of the other. Check through your camera file format menu and select ‘dual recording’ and then select RAW + JPG (fine). With this chosen, your camera will record your photos as both a RAW file and a high-quality JPG file. You’ve now got the best of both worlds. All the detail and quality of the RAW file and the convenience of the JPG file.
Remember, have fun, experiment and you’ll get some cracking results. If you get a moment, share your favourite images with us at facebook.com/2ridetheworld.
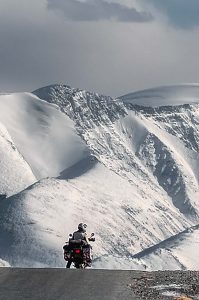
Here’s the info for the image:
Camera body: Nikon D70s
Lens: Nikor 70.0-300.0 mm f/4.0-5.6
Focal Length: 157.0 mm
Focus Mode: Manual
Aperture: f/7.1
Shutter Speed: 1/800 seconds
Exposure Mode: manual
Exposure Comp: -1
Metering: Spot
ISO Sensitivity: ISO 200
White Balance: Standard
Speed light/Flash: Did not fire
Picture profile: Warm
Sharpening: 0
Contrast: 0
Brightness: 0
Saturation: 0
Hue: 0
PROCESSED WITH: Luminar 4