

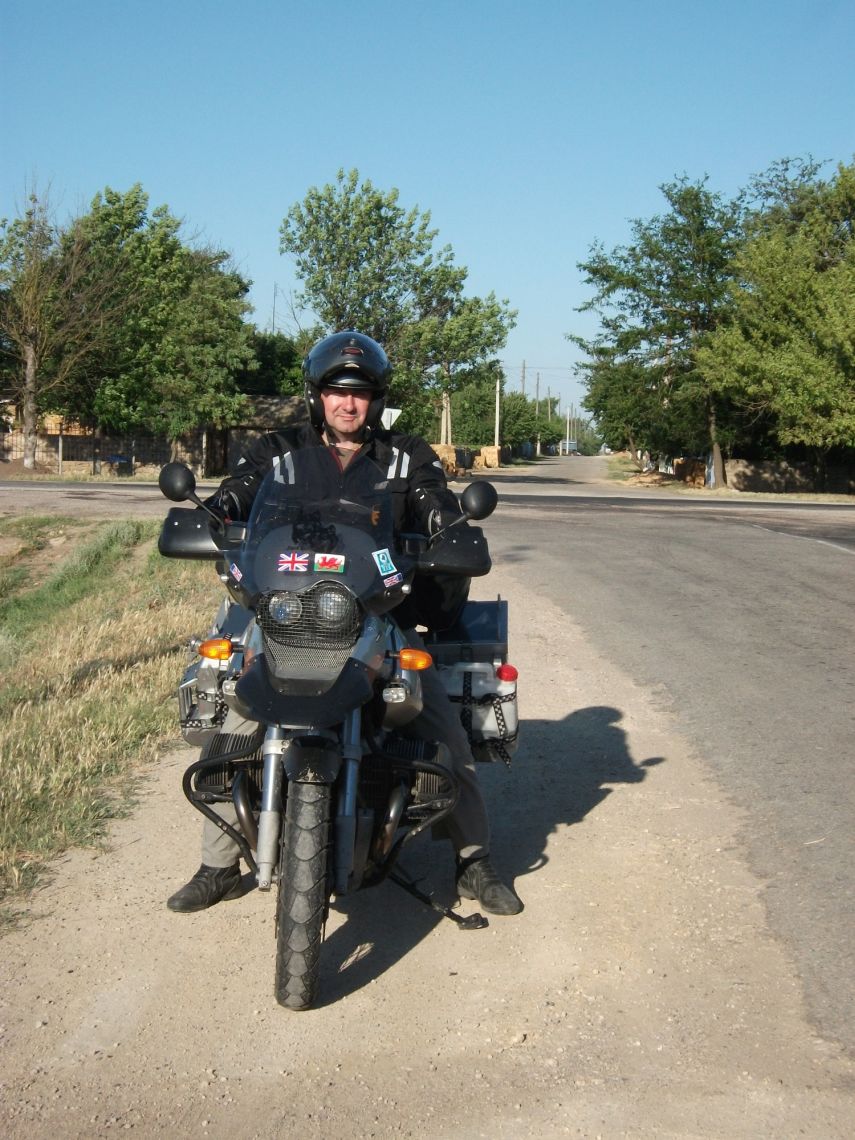
Having ridden in Asia and Eastern Europe countless times, Chono Owen tells us about the modifications he’s made to his steed to make it adventure proof
My name is Chono, and yes I am British, although I changed my name many years ago to a Mongolian one.
Why? Because I have been there over seven times, and I love the people there, plus it has the best off-road motorcycling in the world! Most of my bike mods have a story behind them and as a rule, I only fit the stuff I need.
I also like to live by two adages: expect the best but prepare for the worst, and never overload. I added a pushbike light to my BM after nearly getting wiped out by a Polish driver on the German autobahns when my DT125 suddenly cut out.
It was dark with no road lights and although I was on the hard shoulder this stupid driver drifted to within inches of my bike and actually clipped me.
His front light, side mirror and front wing got smashed, thank God I was wearing body armour.
After that incident, I fitted a pushbike light holder to the rear indicator so I would always be able to clip a visible flashing red light onto my bike if I ever broke down (as a side note, the hi-vis vest I was wearing was useless!).
Aside from the bike light, over the years I have made many modifications to my BMW R1150GS called Ziva. The bike has evolved over many years rather than just being built over a few weeks.
Things I have added include a longer rear Hagon shock, heated grips, handlebar risers, engine crash bars, twin taillights, Touratech pannier rack, tough Stahlkoffer aluminium boxes, pivot pegs, Remus exhaust, Goodridge brake hoses and an adventure screen.
Everything else I made in my garage, sorry I don’t have a shed! I made the rear top rack so it can be used on its own to strap my tent to or for road trips with the top box, or ‘kitchen’ as I call it.
My top box is fitted with tiedown loops which are actually stainless draw handles from B&Q. The screen mounts I made because I wanted to keep the height adjusters and because BMW mounts cause the screen to bounce far too much, the aluminium adjusting hand knobs are from an old radio which I drilled and tapped.
In winter I use a homemade screen extender/spoiler. In the cockpit, I added multiple power points to power my point to point GPS (for when roads run out e.g. Mongolia), my sat-nav, phone, laptop and cameras etc.
Around my clocks I made and fitted an instrument protection bar. I have made and added a stainless exhaust deflector, a horn button cover to stop the tank bag from hitting the horn button, some better-streamlined handguard spoilers (much better than aftermarket ones), a rear brake reservoir cover made from a piece of right-angle aluminium, a heel guard and a bigger brake pedal both made from an aluminium kick plate off a door.
Under the beak, I made a few strap mounts which I strap my bike cover too.
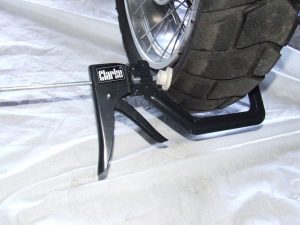
Forget carrying a heavy bulky bead breaker or using a friends side stand.
–
Just carry a lightweight slim and very cheap Ratchet G clamp to get that punctured tubeless tyre off the rim.
The headlight cover is made from five steel tent pegs, which I welded end to end, and a cake rack grill (honestly!). The spotlights are wired into the old heated grips electrics so I can dip them without turning them off should a car come the other way at night.
The guards around the driving lights are homemade as is the crud guard on the front of the engine and extra sump guard on the main stand and the telelever guard on the rear diff. The side stand I have made height adjustable and I also added a bigger foot. Other extras include an oil cooler guard.
Multiple Garmin ball mounts for the sat-nav, GPS and cameras, fuel can racks on the front of my boxes, these I designed so that the Jerrycans would be stepped forward so the rear footrests would take the weight of the cans and not the box mounts.
The whole bike has been raised about 30mm.
Project 1
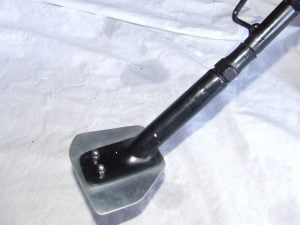
After thirty years of travelling one reoccurring problem kept showing its head. When my bike was loaded up the suspension would sink just enough so that the bike would barely balance on its side stand.
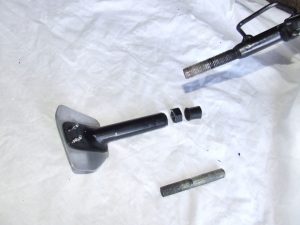
The threaded bar
Also on gravel roads or soft ground, the side stand would sink under the weight and the bike would lean too much leading to it falling over or making it hard to lift off its stand.
Fully adjustable side stand
My answer was to cut the side stand in half and weld a six-inch piece of half-inch threaded bar into the top half.
I then welded a nut to the top of the lower half of the stand and smoothed it off.
After adding a stronger and larger foot another nut was threaded onto the upper half to lock the two halves in place once they were threaded together.
Now the side stand can be extended or shortened as needed…
Project 2
After a heavy fall in the Crimea, I found that the power points and clocks had broken when a rock hit them.
Once home I took some steel tube and made a small protection bar that fitted around the clocks, power points and heated grip switch.
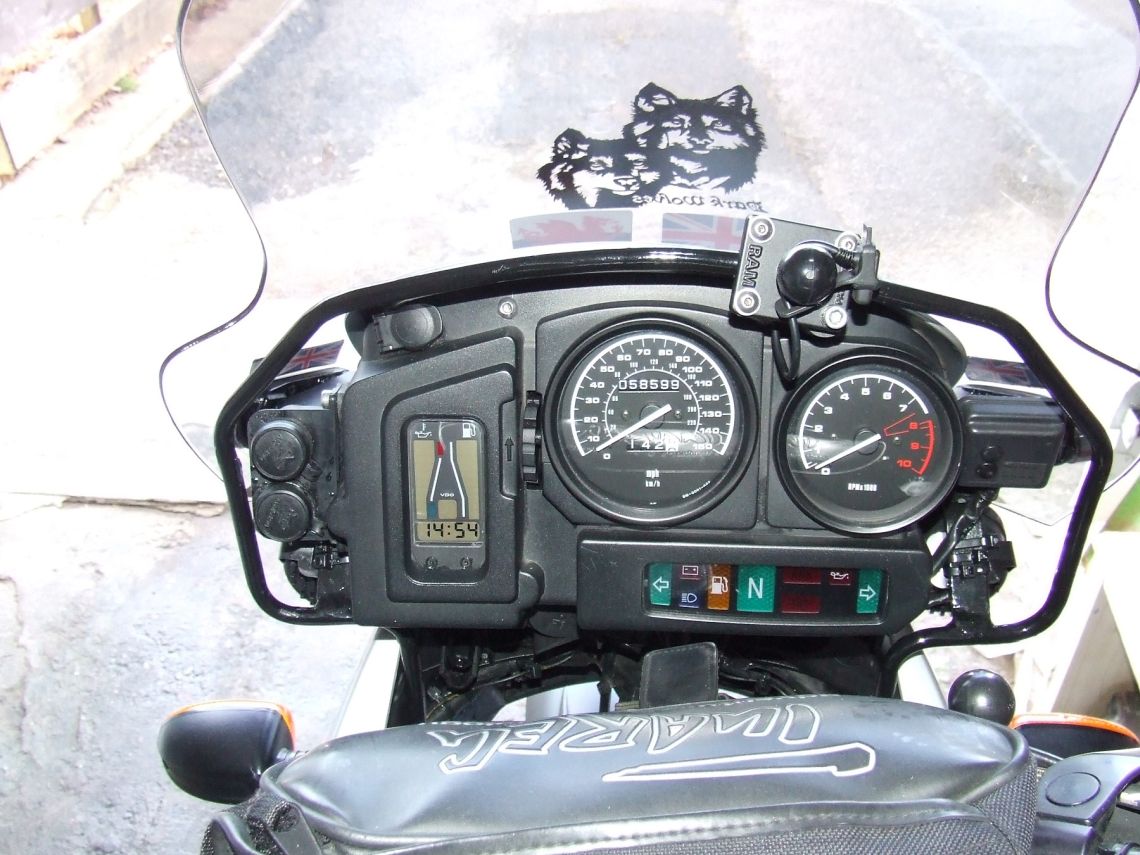
A protective bar will protect your dash
I mounted it to the subframe and the homemade steel screen mounts I had made years before.
I wanted to keep it within the width of the screen but also wanted to be able to mount my GPS onto it, so it was undercover and in front of me instead of off to one side on the handlebars.
When off-roading in Derbyshire I dropped my bike but the bar this time saved my cockpit when it connected with a gatepost.
Do you have your head in the shed?
If you’ve got a DIY bike project to share, email details to [email protected] with a few pics of your handiwork, and if it’s featured we’ll send you some stickers for your pimped up steed.
