
Taking photos when the sun has gone down takes some skill, Simon Thomas from 2 Ride The World walks us through how he took this incredible shot.
We all love to photograph our bikes and with cameras getting smaller and better the images we capture should look more ‘pro’ with each snap of the lens, right? If you really want to have your mates drooling over your images though, a little practice and a few key techniques go a long way.
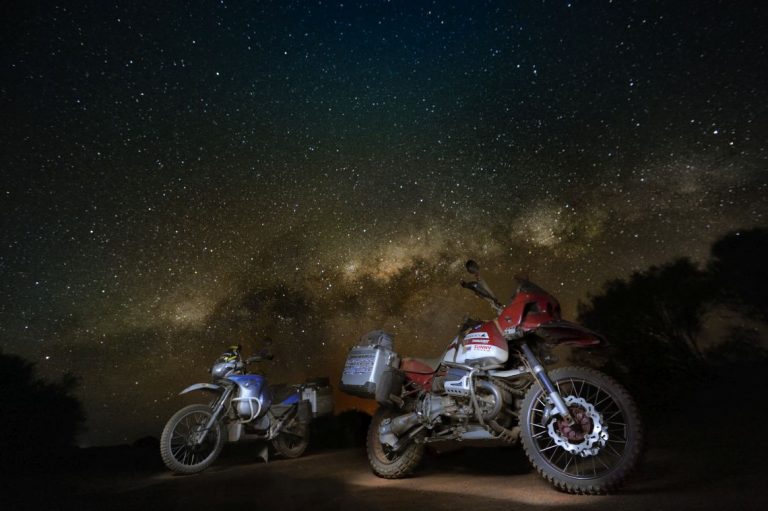
Bagging a great pic of a bike is one thing, snapping a stunner of a shot of the night sky can is another. But getting them both together, well now your talking! Lisa and I rode 2,500 miles of rock, dust and sand across Australia’s longest axis and shot this image in the Outback. This is how it was done.
Camera set up
You’ll need a camera that has a manual mode. Yep, that scary mode where you choose how your camera will take the photo. OK, crank up the ISO (this is the sensitivity of your camera’s sensor) to around 4,000 ISO. We need that extra sensitivity to capture the dim light from the stars.
Set the exposure time to around 20 seconds.
TIP: Don’t shoot longer than 20 seconds of exposure. Because of the earth’s movement through space, the stars are actually moving in the night sky, longer than 20 seconds and the stars will blur and you’ll just get a million smudges in your photo.
If your camera or lens has ‘VR’ (vibration reduction) turn it off.
If you can alter your camera’s colour metering, then set it to Matrix.
TIP: Use a remote shutter release if you have one, if not put the camera on ‘self-timer’ and set it for 5-10 seconds.
This reduces the risk of camera shake when you press the shutter release and will create a sharper image.
Set the aperture to f4 and focus the camera onto your bike.
TIP: You’ll need a torch here to light your bike so that your camera’s autofocus can work ensuring the foreground is sharp and in focus.
Once it’s in focus turn your lens to manual focus to lock it in. Then recompose your shot.
Make sure that in your composition that the sky takes up at least 2/3rds of the image.
Getting into Position
Your camera needs to be absolutely still, so use a tripod if you have one or find a perch (on the ground, on some rocks, a nearby tree or carry a small bean bag) if you haven’t.
Painting with light
Here’s the really cool part. Make sure you have an LED torch and just after the camera shutter has been released (the start of the 20 seconds) run into the shot and quickly shine your torch across bikes (foreground) and then move back behind the camera. Don’t worry you won’t actually appear in the photo. This is going to highlight your bike and make it stand out against the sky.
TIP: Do not use a regular bulb torch, as the light it emits is too yellow.
Good luck and remember to play around with these settings.
TIP: DELETING IS FREE!
Technical info:
Camera body: Nikon D3
Lens: VR 16-35mm f/4G
Focal Length: 16mm
Focus Mode: Manual
AF-Area Mode: Single
VR: OFF
Aperture: f/4
Shutter Speed: 20s
Exposure Mode: Manual
Exposure Comp.: +2.0EV
Metering: Matrix
ISO Sensitivity: ISO 6400
Picture Control
Picture Control: [NL] NEUTRAL
Base: [NL] NEUTRAL
Sharpening: 4
Contrast: 0
Brightness: 0
Saturation: +2
Hue: 0