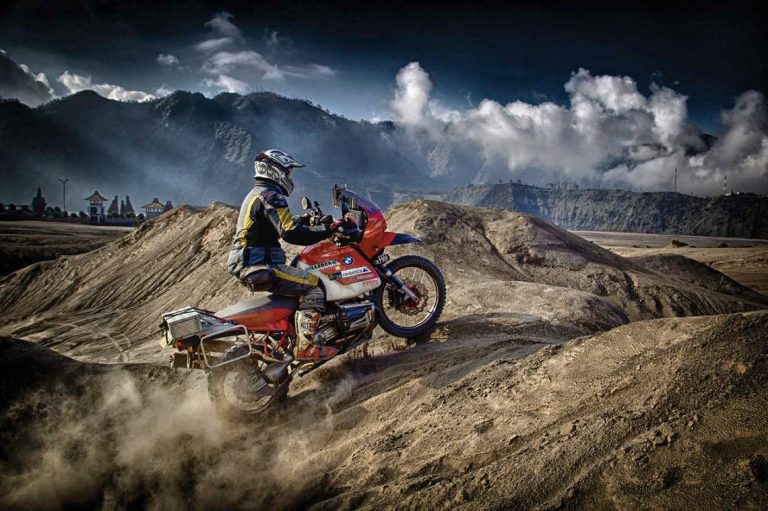
ABR’s photography expert, Simon Thomas, shares his secrets for creating the perfect high dynamic range riding shots.
Most people seem to either love or hate HDR (High Dynamic Range) photo images. Personally, I love them, but only when they’re done well. There are two kinds of HDR, the good kind that makes people’s faces scrunch up and wonder ‘how did he/she shoot that’? Then there’s evil HDR that looks like someone grabbed a snapshot from Tron whilst on hallucinogens.
Sadly most HDR images out there are overworked, over-saturated and over-edited, to the point that they’re unrecognisable from what the photographer saw when looking through the camera lens. Remember, when it comes to HDR images ‘less is more’.
What is HDR
HDR is a post-editing technique that allows the photographer to capture otherwise impossible images. Whether you’re shooting in auto or a carefully calculated manual mode, your camera is limited to what detail it can capture. If you’re shooting in dark or shadowing conditions you’ll lose detail in the brighter areas and conversely, in bright conditions, you’ll lose the detail in the dark regions. Using this HDR technique, you can get it all as it simply combines the details from a number of images to create a single, detailed shot.
Setting up your camera
We need to shoot for HDR, which means setting up your camera to capture three to five images of the exact same scene, shot at different exposures. One image will be shot at the best exposure for the scene and the others will be over-exposed and under-exposed. See the example on the next page.
Set your camera on a tripod. Put your camera in Aperture mode and select a mid-range f-stop like f8. Set up your shot and decide where you want to shoot the rider as they pass through your scene. Press the shutter button halfway down to bring that area into focus, then lock in the focus by turning the autofocus off. If your camera or lens has ‘VR’ (vibration reduction) turn it off.
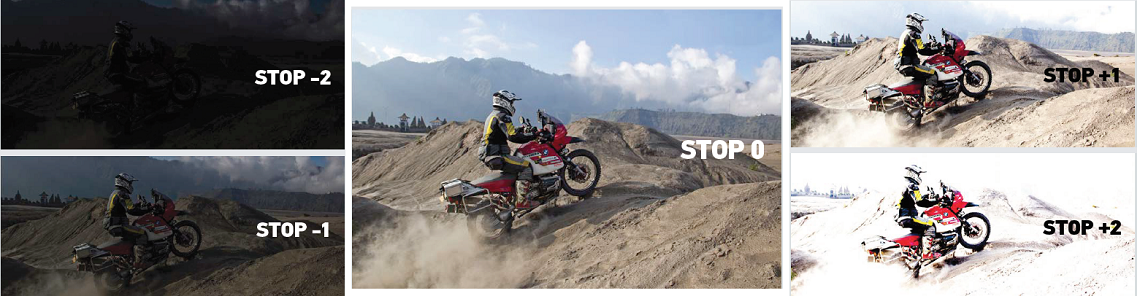
Now find the ‘bracket’ button on your camera and turn it on. We’re telling the camera to capture one correctly exposed image and then a number of other images that are both brighter and darker. Use your camera’s sub-command button to select the bracketing amount to either one or two stops.
We need a bracketed set of at least three images. I usually set my camera to shoot five to nine images and I then choose the best images to create my final HDR image. If you can alter your camera’s colour metering, then set it to Matrix. Set your camera into ‘burst’ mode, also called ‘continuous high shooting mode’.
■ TIP Use a tripod if you have one. Set your camera into burst mode so you can take multiple images quickly by holding down the shutter release button.
■ TIP Use a low ISO if possible; try ISO 200, 100 or lower if your scene is bright enough.
Getting into position
Ask the rider to moderate their speed. If the rider is too fast, they’ll pass through your scene quickly and you’ll miss capturing the bracketed shots you need to capture.
As your rider hits the focus area press the shutter release and hold it down to allow your camera to capture the five-plus bracketed images that we need.
A Bridge too far
Open up Adobe Bridge, browse to where you’ve saved your bracketed images and select 3 images you want to work with. I select the normal exposure image and then one that is shot at +2 stops (brighter) and -2 stops (darker). Select all three images and then select Tools in the main menu (top row), then select Photoshop from the dialogue options and lastly select Merge to HDR Pro from the grey drop-down box.
In the Merge to HDR Pro Dialogue that has now appeared on your screen, you’ll see the three images you’ve selected and Photoshop’s best guess as to how you’d like the images combined into a single image in the main preview pane. It’s OK, but we can do better.
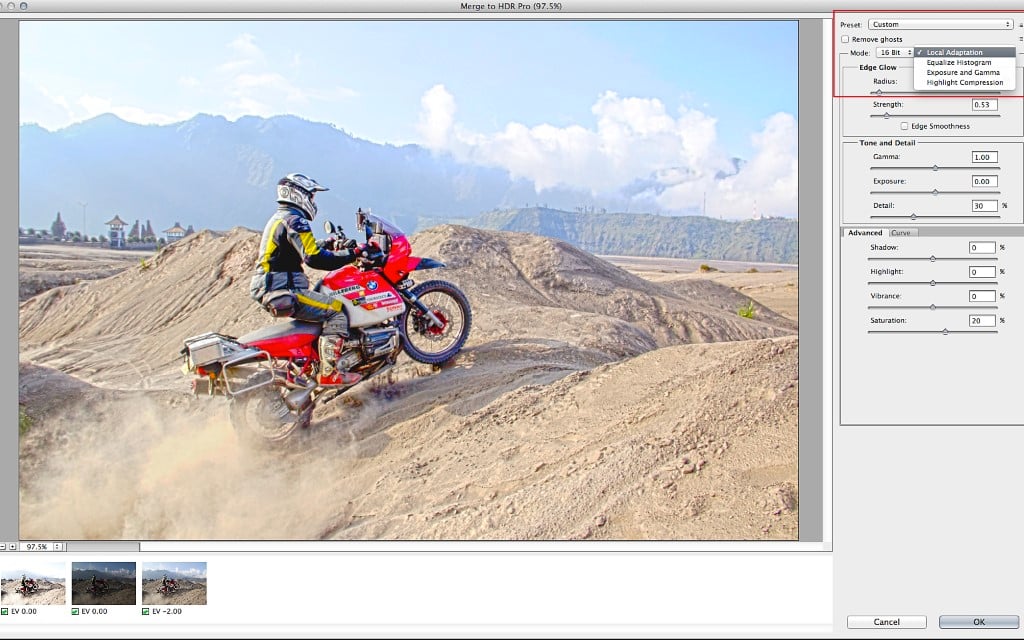
Select the Local Adaption from the top right of the dialogue. See the example above.
Settings
OK, there’s no one size fits all set of parameters that’s going to suit every type of image scene. Check out the setting in the example above. I typically use these as a starting point before I begin to fine-tune the sliders and commit to a final output image.
Enter these settings into your HDR and experiment from there. Bear in mind this is going to be a two-stage process. If you think your image needs a little more contrast then boost the S-Curve using the settings below as a guideline.
- Remove Ghost: Check
- Radius: 176
- Strength: 0.47
- Gamma: 0.76
- Exposure: 0.30
- Detail: 300
- Shadow: 90
- Highlight: -90
- Vibrance: -5
- Saturation: -1
When you’re happy, head down to the lower right of the main dialogue box and select OK. This will close down the dialogue box and launch your HDR file inside Photoshop.
Round Two
You’re almost there. From within Photoshop head to the main top menu and select ‘save as’ and save this new image as a TIFF onto your desktop or the preferred location.
Now, from Photoshop’s file menu, select the image you’ve just saved. Before you select open, click the format drop-down dialogue and select the ‘Camera Raw’ option. This will launch the file into Adobe’s Camera Raw environment instead of directly into Photoshop.
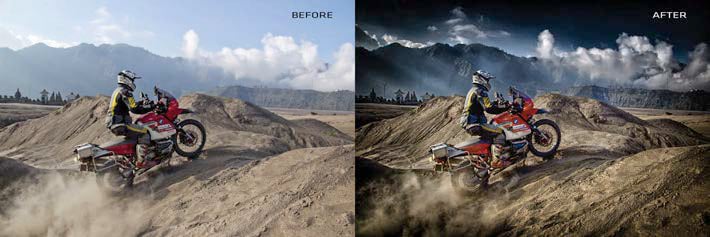
Inside Camera Raw I normally lower the saturation, reduce the vibrancy and increase the dark blacks and contrast. It’s personal preference but I like my HDRs to look subtle. But hey, if that neon, eye-searing saturation, mega detail thing is for you, then go for it. Here’s the numbers I used in stage two for this shot of me riding inside a supervolcano crater on the island of Java.
- Exposure: -42 darkens the image a little
- Contrast: -34 opens some of the mid-tone detail
- Highlights: -2
- Shadows: -14 darkens the shadows
- Whites: +2 brightens the whites
- Blacks: -53 puts back some dark contrast
- Clarity: +45 brings out that HDR detailed look
- Vibrance: -24 reduces any false coloured look
- Saturation: -8 makes the image look more natural
Lastly, click on the lens correction icon in the top right of the main camera raw dialogue box and then select the manual tab. At the bottom of the panel, you see the Lens Vignetting option. Drag the slider to the left to between 70-80.
Select the ‘save image’ option in the bottom left of the camera raw dialogue box and finally select a file type (.jpg) and a location to save your newly created HDR image.
Now go and get a long drink, you’ve earned it.