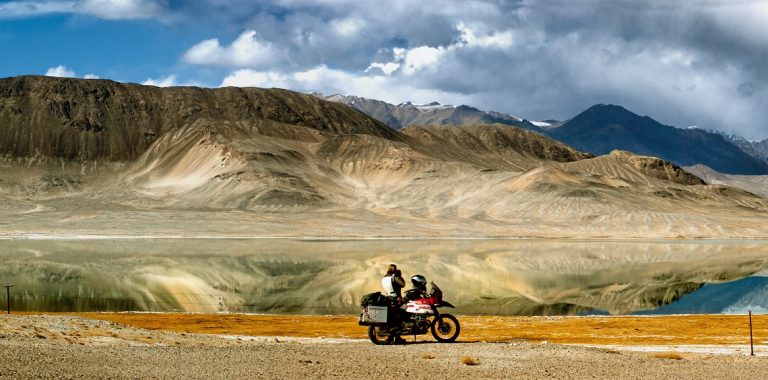
ABR’s photography expert Simon Thomas shares his secrets to creating the perfect panoramic photo
There’s nothing like the feeling of escaping on your bike to a wide, expansive landscape, opening the throttle and getting lost in the moment. Whether you’re surrounded by distant mountains, desert or an endless savannah, the moment is still special.
Being able to capture and share an image of that vast landscape you’ve just ridden into is pretty special too, as is the technique used to capture those wide panoramic images that we see in magazines like Adventure Bike Rider and on the web. Sure, there’s a learning curve to getting it right, but once you’ve nailed the technique, I guarantee you’ll be addicted to creating more and more dramatic panoramas.
Here’s how it’s done
Panoramas are created from photographing a number of images in sequence, and moving the camera slightly between each shot and then stitching the images together in a post-processing program like Photoshop.
Bear in mind that creating a super-wide image doesn’t necessarily make for a great photo. The trick is to make sure that you’ve got something of interest in your foreground, middle and background. Keep a lookout for trees, lakes, a posed motorcycle, (my favourite) mountains, dramatic skies or even a road that sweeps around a long bend or disappears into the distance.
Turning heads
To make sure that your images line up you’re going to need to use a tripod. This will also ensure that your huge panorama is tack sharp. Remember to turn the VR (vibration reduction) off. Adjust or loosen the head of your tripod to allow for smooth movement through the horizontal plane. Yes, that just means left to right or vice versa.
Now, tilt your camera into a portrait position. Shooting in portrait will allow you to capture taller images. In turn, this means your finished panorama will have more details and give you more editing and cropping options. Shooting in landscape orientation is a newbie mistake, so avoid it.
Exposed
Set your camera to manual exposure, this ensures that each image in your sequence is exposed equally (no images are brighter or darker than the others). Set your exposure for the brightest image in your sequence.
To be safe, go ahead and dial in 0.3 – 0.7 stops of exposure compensation to ensure that you don’t lose detail in the brightest areas of your images. I like to shoot somewhere between f8 and f16, this means I can capture a stronger field of depth and my image is sharp from front to back.
Focus
Point your camera at what you want to be the focus of your panorama and press the shutter release button halfway down to focus the lens on that spot. Now, turn your lens from Autofocus to manual. You’ve just effectively locked in that focus. Alternatively, just select manual focus on your lens and turn your lens ring to focus on your subject or, somewhere between your foreground and background.
Overlap
It’s picture taking time! The key to creating great panoramas is to ensure that each of your images in your sequence overlap. How much overlap? Well, my advice is make sure that each image overlaps the last by 1/3 to a half. Too much overlap is better than too little.
I use Adobe Bridge to select my image sequence and Adobe Photoshop’s automated ‘Photo-merge’ feature to align and stitch my sequence together.
The shot here was taken by Lisa and is comprised of nine separate images stitched together to form this one panorama. Asia’s famous Silk Route makes for one hell of a backdrop.
Go get stitching, you’ll be amazed at your own results.


