Effective use of zoom blur can take your photography to a whole new level, here Simon Thomas reveals the secrets behind this impactful technique.
Each photo you take tells a story; the problem is that you only have a few seconds to tell that story before the viewer gets bored and looks away. Powerful photos grab a viewer’s attention and force them to look longer and engage. So, if you want to capture powerful photos, the key is to use photographic techniques that enhance the important parts of the image.
There are a number of techniques you can use but one of the easiest to learn and my favourites to use is lens blur. Besides, it also sounds cool.
There’s no special gear involved and you don’t need insanely expensive kit to use this technique. Any DSLR camera, zoom lens and a tripod will work.
Zoom blur is really just an effect achieved by zooming your lens in or out whilst you take a photo. The results, though, can be dramatic. Zoom blur is a simple way to add a sense of movement or action to your image or to simply force the viewer to look at one aspect of the image like I’ve done with the photo used in this article.
Technique
We want the edges of the photo to be blurred but we want to make sure the important elements of the images are sharp, so, pop your camera onto your tripod or steady it against a flat surface. You’re going to use a shutter speed of ½ second to four seconds.
You could use manual mode, but instead put your camera into shutter priority mode and dial in the speed you think you need. Remember, if the speed selected is wrong and creates an image that is under or overexposed, you can just delete it and retry. Ahh, the joys of digital.
Zoom all the way into your subject and frame the shot that you want to capture. Press the shutter release button halfway down to activate the autofocus and then lock in the focus by turning your lens autofocus off.
Next, zoom out to the widest angle that you want to capture. Now comes the good part. Press the shutter and zoom in smoothly until your lens is zoomed back to maximum (as you did above when setting up the shot). Try to keep the zooming speed smooth and steady all the way in.
As I mentioned earlier, if your image is too bright, try using a narrower aperture. Alternatively, if the image is too dark, widen the aperture. This technique is about practice and reviewing each image after you take the shot. So, use that LCD screen and check each image to make sure you’re capturing what you’d hoped for.
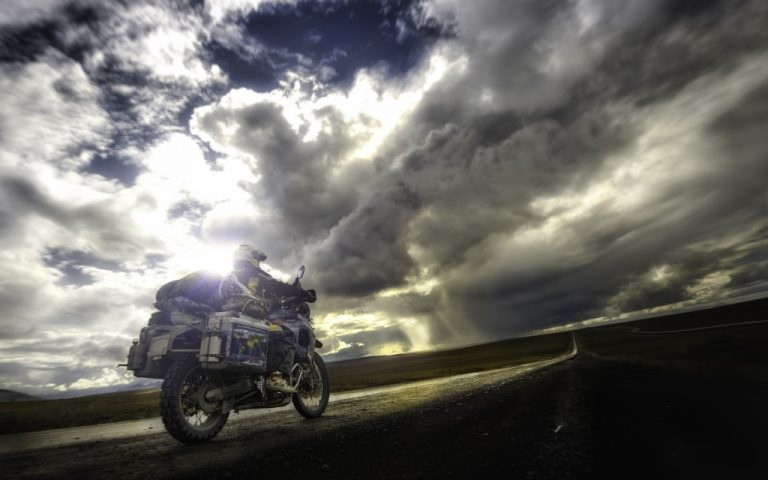
Remember, less is more. In the photo of Lisa on the Dalton Highway, there’s so much going on between the light, the rider and the detail in the clouds, that it would be easy for the viewer to get lost.
Using subtle zoom blur I am pushing the viewer’s (yep, that’s you) eye towards the important parts of the image i.e. Lisa on her F800GS, the light show on the horizon and the road trailing into the distance. The use of zoom blur also removes some of the overwhelming edge detail, again focusing your eyes on the centre of the photo.
Give this technique a try and you’ll be impressed by what you can achieve.