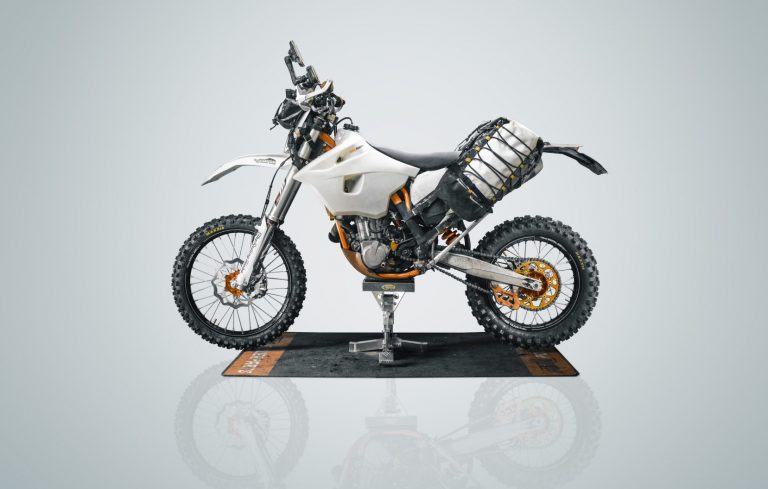
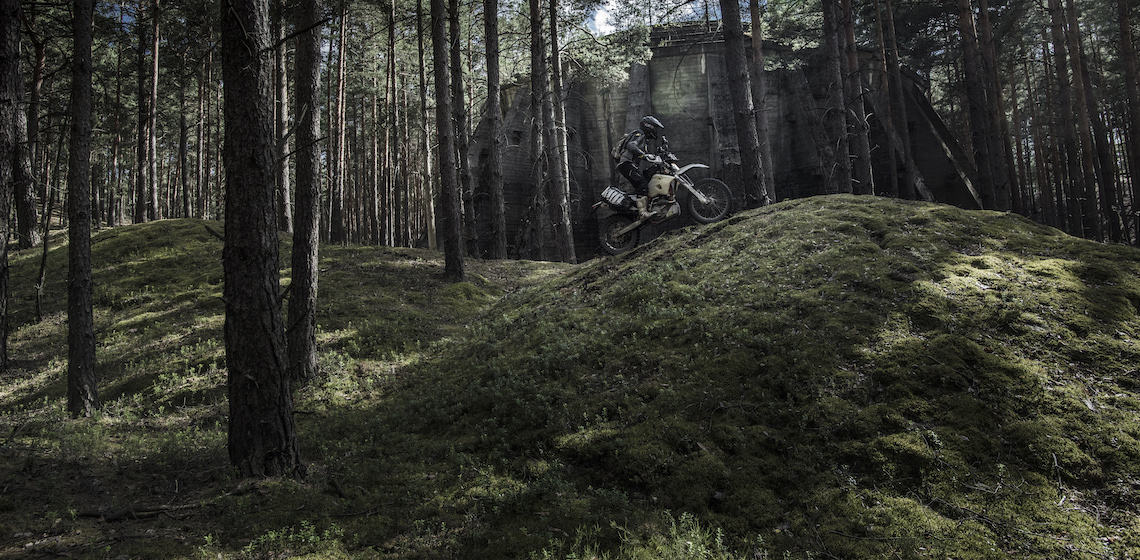
After finding that his 690 Enduro R wasn’t quite up to the job he was asking of it, Jussi Hyttinen sets out to build the ultimate adventure bike using the KTM 500 EXC as a Base
I felt dizzy and nauseous. My heart rate was jacked and my head was thumping. Or maybe it was the idling engine of my KTM 690 Enduro R, lying on its side on the steep overgrown trail. I wasn’t sure, but I realised that I’d found the limits of what I could do with the 690.
Revolutions of evolution
Adventure riding is a holistic discipline. It revolves ceaselessly through the cycles of preparation, riding and planning the next adventure. Throughout the process, the bike, equipment and riding gear are continuously improved. Each day of riding gives more insight, and equipment either works or it needs to be rethought. High-quality gear that performs reliably under extreme conditions is of paramount importance in running successful expeditions.
My faithful travel companion from 2013 to 2015 was a KTM 690 Enduro R. We travelled together for over 25,000 miles in 20 countries, shared incredible experiences, overcame obstacles in rough terrain and saw both good days and bad. It is a fantastic bike for rally type operations and has decent enduro capabilities, as long as the terrain is not too steep. However, it suffers on technical mountain trails, as I found out on that hot evening in Macedonia.
Why the KTM 500 EXC?
Admittedly, I bleed somewhat orange, but the final decision on bike selection was purely logical and unemotional. A fundamental requirement was that the bike had to be new, which slimmed down the list of options considerably. In the end, the 2016 KTM 500 EXC ticked all the boxes of my criteria.
With weight, less is more. The energy a rider spends in technical terrain is relative to the weight of the bike. It similarly affects the probability of spills and the energy required to pick up the bike and recover after it. So the 112kg dry weight of the stock 500 makes it a fantastic platform to build on.
The suspension is great out of the box and needs very little modification to work well in adventure enduro. The PDS design of the rear shock is very simple and has no components or bearings in harm’s way below the swingarm.
The 510.4 cm3 single-cylinder engine produces ample power for adventure enduro. It has plenty of bottom end grunt without the proneness to stalling at low revs, making it very suitable for technical stuff, and allowing for cruising at low-impact revs. However, there’s also violent power higher up in the rev range for when the front wheel needs to touch the sky.
The gearbox is pure enduro, so the first gear is nice and short. It makes life a lot easier with tricky starts on steep technical terrain. Even with enduro final drive gearing, the sixth gear is still tall enough for a nice marching pace.
From good to great
Buying a bike is just the beginning of the project, and no bike will survive adventure enduro rides right off the production line. The two main design fundamentals of the build were intertwined. One affects the other and vice versa. The final build is a delicate balance of terror between weight and endurance.
The obvious goal was to keep the bike as light as possible, which is easy with parts selection. The hard part is applying the same fundamentals to everything that goes on the bike.
It has been an interesting journey of rethinking and tweaking everything over and over again. I always fancied myself as a bit of a minimalist and compared to many it was true. However, looking back now reveals a completely different reality.
The 500 project resulted in my luggage being cut down to around 12kg including tools, spare parts, camping gear and personal clothing as well as photography gear. Ergo the fully loaded and fuelled weight of the bike is currently around 150kg.
One of the most interesting aspects of the build was that it is essentially a race bike and built for short term extreme use. So there was, and still is, very little factual information on the long term endurance of the 500 in moderate use. The bike needs to endure up to 12,500-mile rides, and not just one. But to be honest, this is more of a service dilemma than a design challenge.
Wiring and components
Dirt, vibrations and loose wires are a recipe for electrical problems, which may turn out to be plentiful and hard to find in the field. Reducing the risk is the first thing to address when the bike is new and everything is still clean. Copious amounts of electrical tape and zip ties will help stabilise the wiring and protect it from dirt. Strips of mountain bike tube work well in high abrasion areas.
All wire housings on the 500 are cut a little before the connectors to ensure efficient water drainage. I usually tape over the housings and connectors if they are mostly dry. If they’re likely to get submerged, it’s better to leave them open to avoid trapping water within the housing, which will eventually slowly seep to the connectors and corrode them.
All connectors should be sprayed with contact cleaner regularly to avoid any problems. The starter and fuel pump relays in the back of the bike should be secured to their sockets with zip ties as they can fall out when the going gets rough.
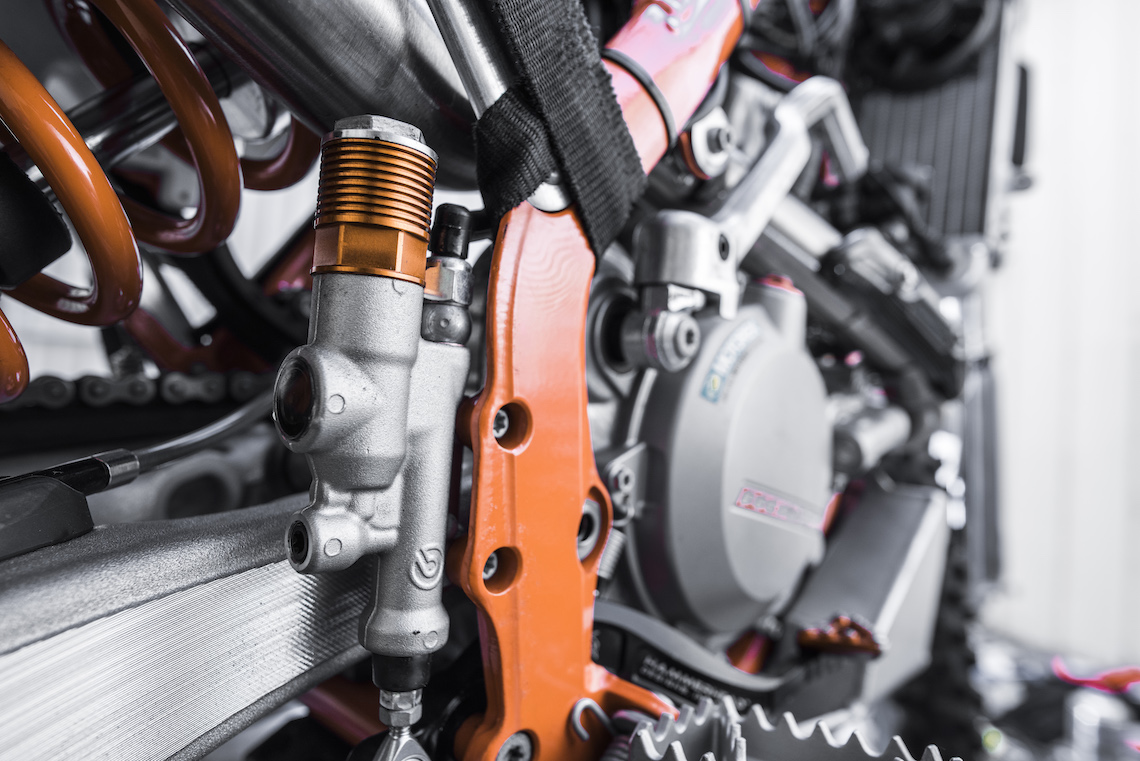
Chassis
The stock suspension is great, but I replaced the OEM rear shock spring with a stiffer 80 N/mm spring to cope with the luggage. The shock also now has a quick preload adjuster for easy switching between loaded and unloaded riding.
To avoid clutter in the cockpit and interference with navigation equipment, the front brake is run rally-style between the headlight mask and front fender. The modification can be easily done with the original brake hose, and needs nothing more than patience and a few zip ties.
The rear brake is fitted with a cylinder extender. It should cool down the brake fluid and extend its life, but the jury’s still out on that one. Another modification to the rear brake is an extra thick closed brake disk, for longevity and to reduce wear on the rear brake pads. With the standard open brake disk, brake pads can go in a single day of riding in wet and sandy conditions.
The rear sprocket on the stock 500 is bolted directly on the hub. It’s fine in dirt, but on tarmac it may have serious consequences due to the lack of natural damping. The front sprocket may start to wear out the countershaft, causing it to eventually fail.
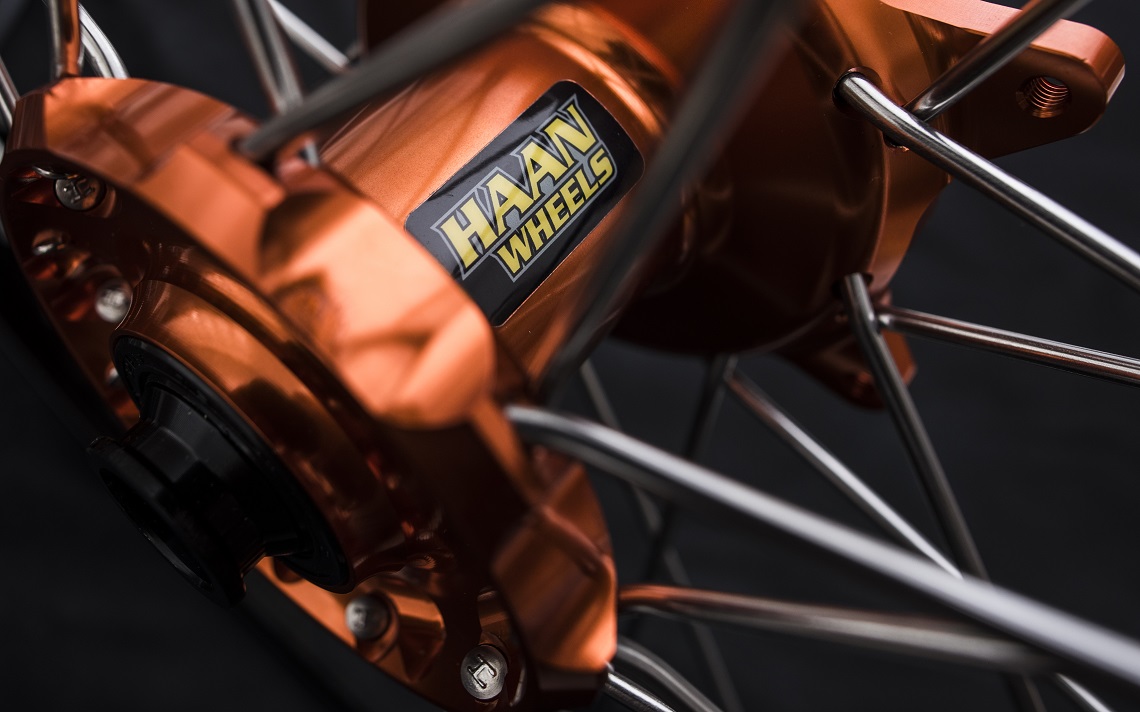
A damped rear hub will counter this problem and generally reduce impact throughout the transmission. I splurged on a set of Haan wheel hubs with a damped rear and Excel 18/21 A60 rims. I’ve traditionally run Mitas C-02 rears, but have since switched to a Maxxis M7313/M7314 combo which seems to work well.
Gearing is set at 13:50 with SuperSprox Stealth sprockets. With 14:50, the bike tops out at 150 km/h fully open, but I found the first gear too tall for technical stuff. The 13:50 is fantastic on technical terrain and the bike will still cruise nicely. The chain is connected with a quick link, run through a beefy TMD chain guide and lubed with an OSCO chain oiler.
Engine
The engine oil volume has been debated until exhaustion, with different expansion methods from bigger clutch covers to external oil coolers. I decided against the cooler as it adds weight and four wet connections. It requires rare oil filters and complicates the oil change procedure. So a lot of extra hassle and risk for little gain, and I prefer frequent oil changes instead.
The factory oil cap has extra durability and a smaller chance of it loosening and falling off. On the topic of factory parts, theoretically, the orange oil pump cover cools the oil microscopically, but… Orange billet, what can I say?
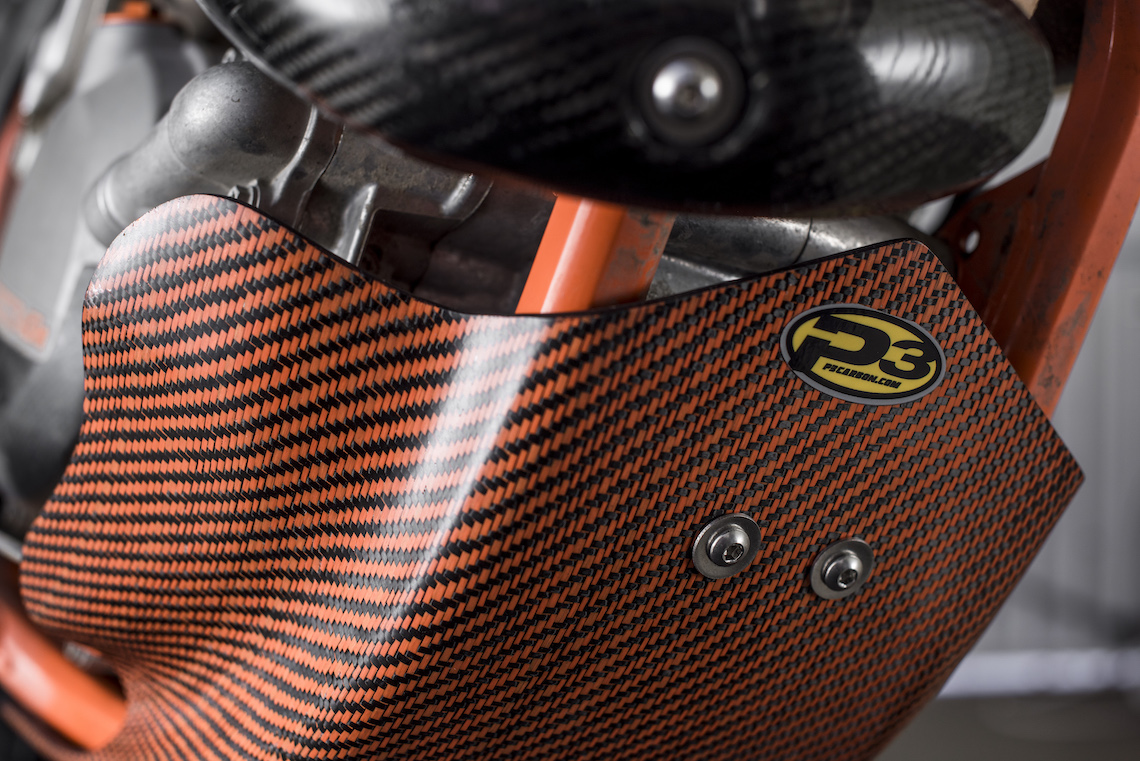
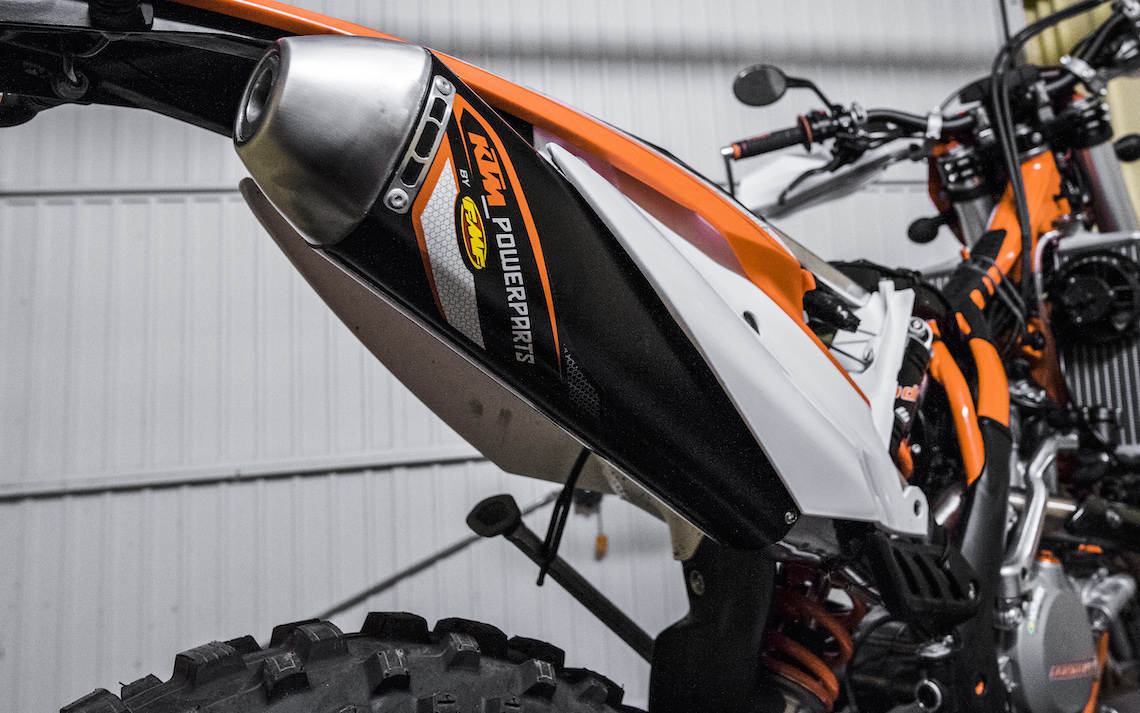
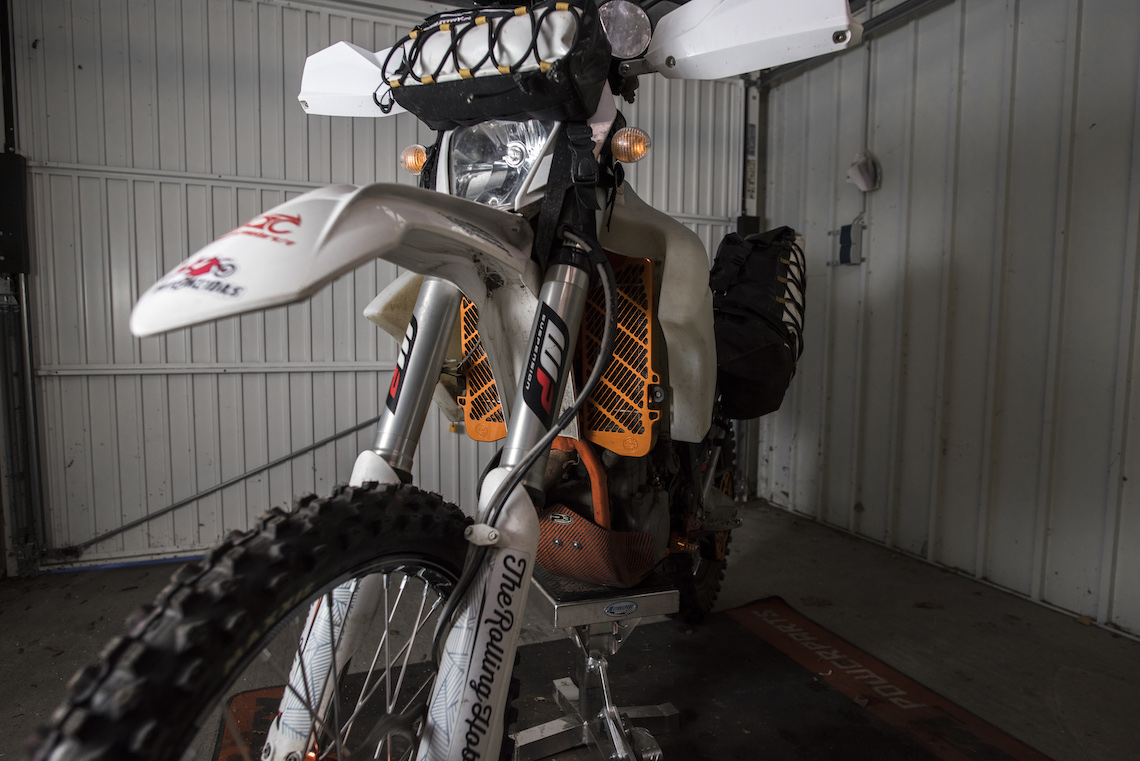
The factory slip-on silencer worked fine, but I switched to an FMF Competition silencer. It’s lighter, which makes a difference as it’s high on the bike. It also improves performance throughout the rev range. The header, and my pants, are protected by a P3 Carbon pipe guard. The other end of the exhaust has a heat shield to prevent my luggage from melting on the silencer.
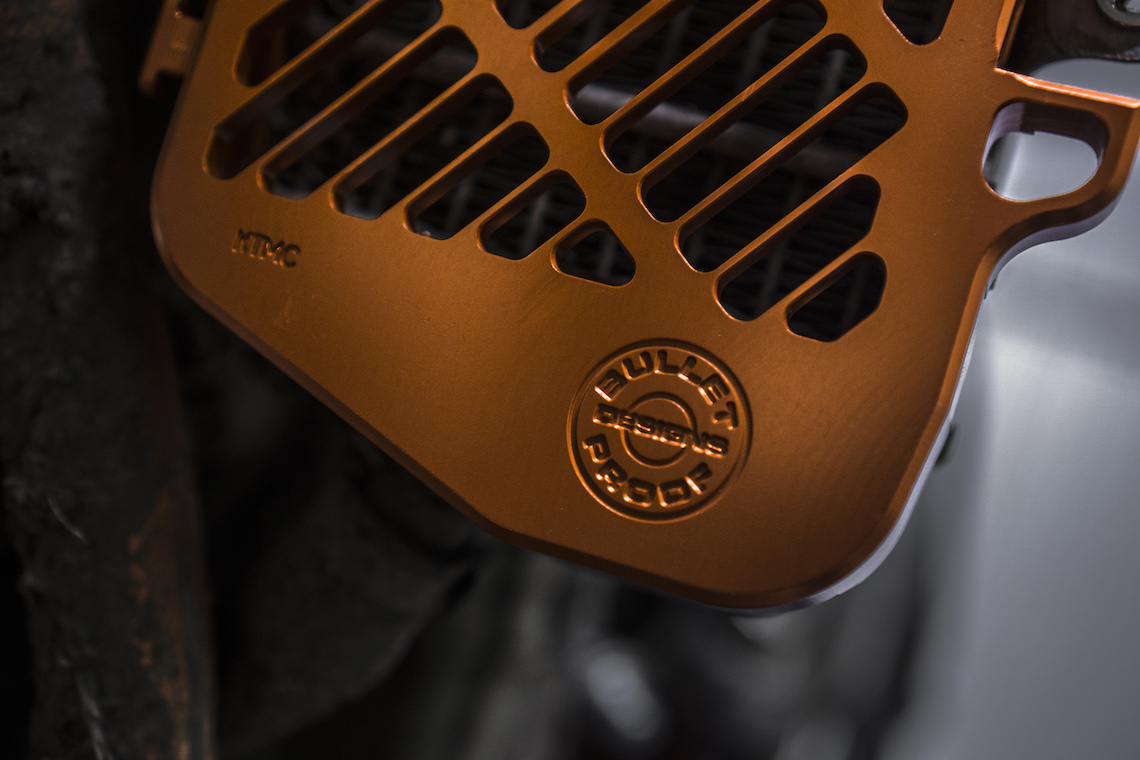
The stock bike has a radiator fan, which is essential. I run a Trailtech engine temperature gauge on the radiator with the EZ-Install fin sensor, and the reduction in temperature is dramatic when the fan kicks in. The radiators are protected by Bulletproof Designs billet aluminium guards.
The brake lever tip teeth like to puncture the clutch cover in falls. The P3 carbon clutch cover protector should address the matter and prevent wear from boots. Further back, there’s a KTM clutch slave cylinder guard in case a snapped chain whiplashes through the front sprocket.
The bike now has a single 19-litre KTM Powerparts fuel tank. It’s large enough for most days, but for longer sections, I’ll carry a fuel bladder. The tank does need a little protection from the radiator tabs, and bolting on some rubber bungs will help.
I didn’t bother adding an extra fuel filter or an aftermarket filter. Instead, I change the OEM filter frequently. The fuel tank quick release is protected from dirt with a section of MTB inner tube.
The air filter cover comes fitted with quick release pins, which is handy for maintenance, but it can become accidentally dislodged. So I’ve screwed it on instead, and upgraded the OEM filter bracket stud with the factory version to avoid trouble on the trail.
The standard TwinAir pre-oiled air filters work fine, and I carry several filters instead of washing and oiling them on the trail. This is just to save weight as the filters are light and can easily be carried compressed into small ziplock bags.
I run with the standard ignition map but have the map switch on the handlebar in case available fuel is of dubious quality or low octane. The bike runs a little lean on low revs and likes to pop on deceleration. This can be cured by tuning the injection map or tweaking the throttle position sensor with a TPS tool. They also make a handy battery backup capacitor which will allow the bike to be kickstarted if the battery is depleted or malfunctioning.
The engine is protected with a P3 Carbon skid plate. Not only is it light and strong, but it has to be the most beautiful skid plate I’ve ever seen.
Controls
The handlebar is fitted with a Scott’s steering damper and a single folding mirror, which is mostly tucked away behind the handguard.
The original clutch and brake levers are replaced with Midwest Mountain Engineering Clever Levers, which are a lot lighter to pull and designed for single finger operation. The grips are KTM standard and fitted with grip donuts to avoid blisters. My hands are protected with aluminium rail guards, but they also protect the handlebar, levers and throttle tube from damage in falls. Due to vibrations, I’ve drilled right through the rails and bolted the deflectors through them with washers and Nyloc nuts.
The throttle cables are somewhat exposed on the top of the handlebar, and a KTM metal protector will give them a better chance of surviving. To make sure the cables stay put while fitting the tank, I run a strip of inner tube over them on both sides of the frame, from the tank’s top mount to its side supports.
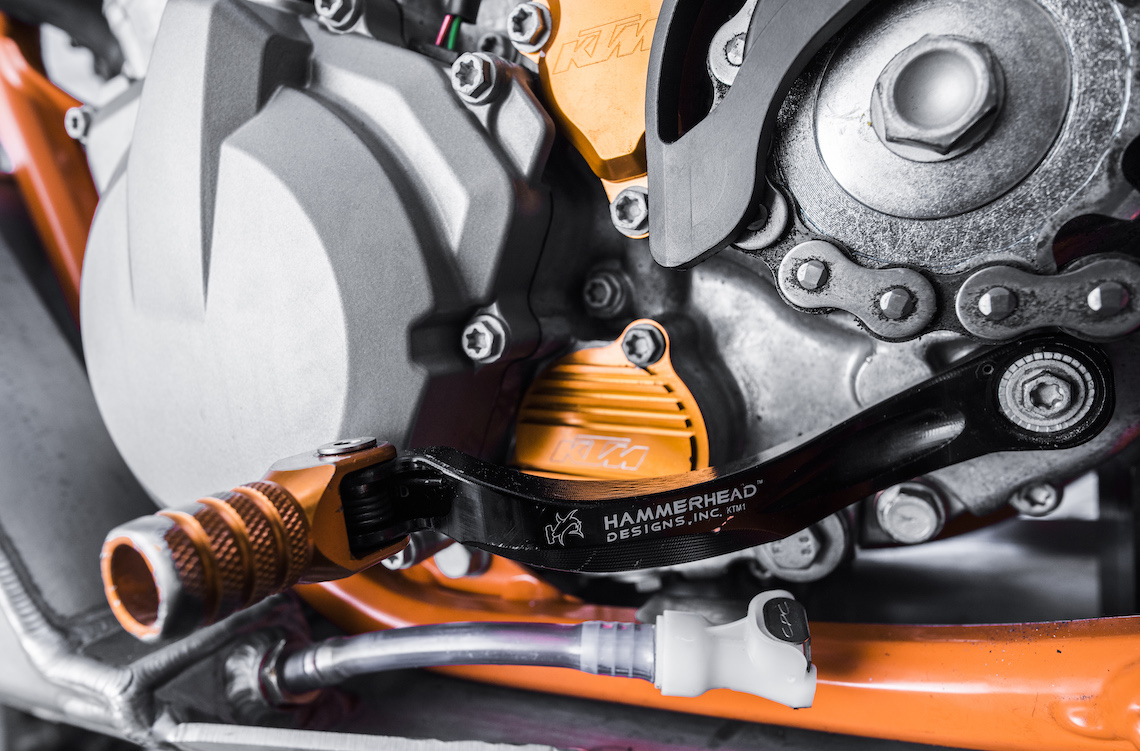
Lower on the bike, the original pedals are replaced by Hammerhead Designs pedals for extra durability. Hammerhead also produces a handy lock wire bolt for the shifter pedal which works like a charm in securing it. The brake pedal can scoop trail debris between itself and the clutch cover, but a security wire from the pedal to the frame will reduce the risk.
Electrical Stuff
The 500 is pretty spartan when it comes to electrical equipment, so everything needs to be built. KTM has a handy auxiliary wiring harness, which is wired directly to the battery and has a 7.5A fuse. The harness powers two Garmin Montana navigators in powered Garmin cradles, a Baja Designs SII LED spot high beam and a USB socket in my mask bag. The accessories had bulky connectors which are prone to failure inside the tight headlight mask, so I soldered everything instead, resulting in a clean configuration.
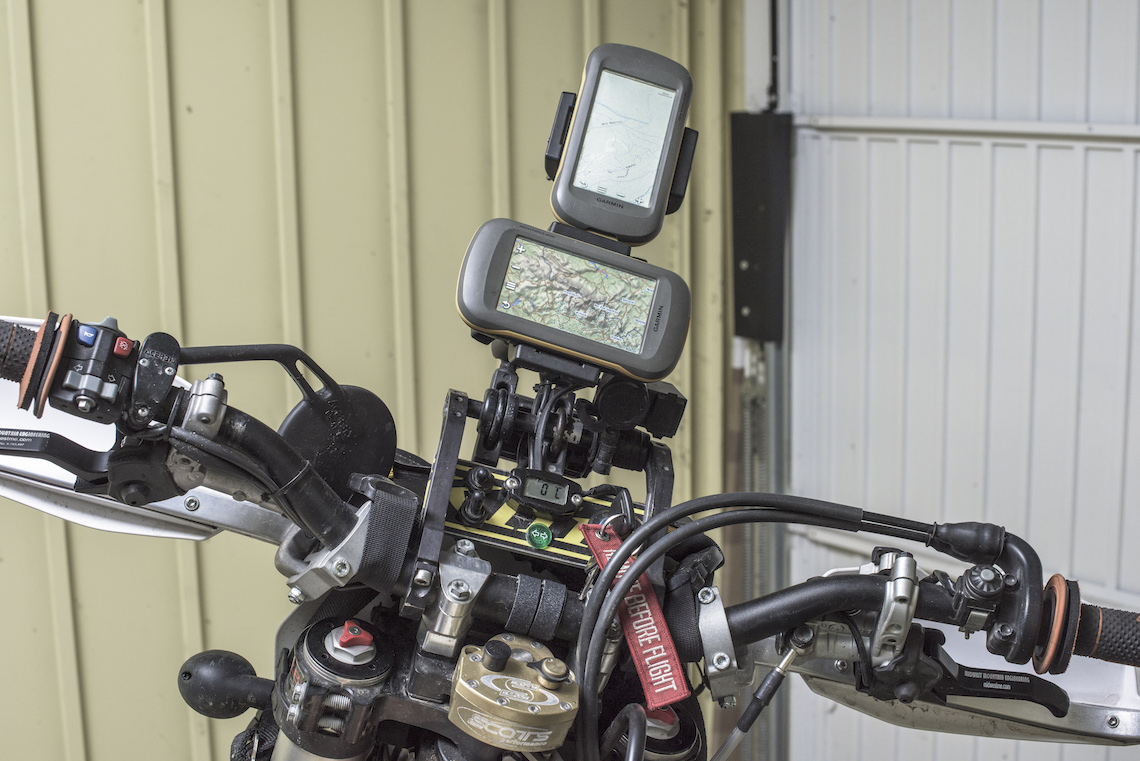
The handlebar can end up cluttered with all the extra equipment, so I use RMS Universal Navigation Clamps with RAM mounts to get everything where they’re supposed to be. I also made a ghetto instrument panel from a 4mm aluminium sheet. The mounting surface is roughly 120 x 50mm and has holes
for mounting an ignition switch, a turn signal warning light, an engine temperature gauge and two waterproof accessory switches. The first switch is the main accessory power switch and the second one selects which headlight is switched on from the OEM high beam switch; the OEM or the Baja Designs SII LED spot. The exhaust eats the right hand side OEM indicator, so I went with some tiny LEDs and a soldered LED indicator relay for the correct timing of the blink.
Luggage
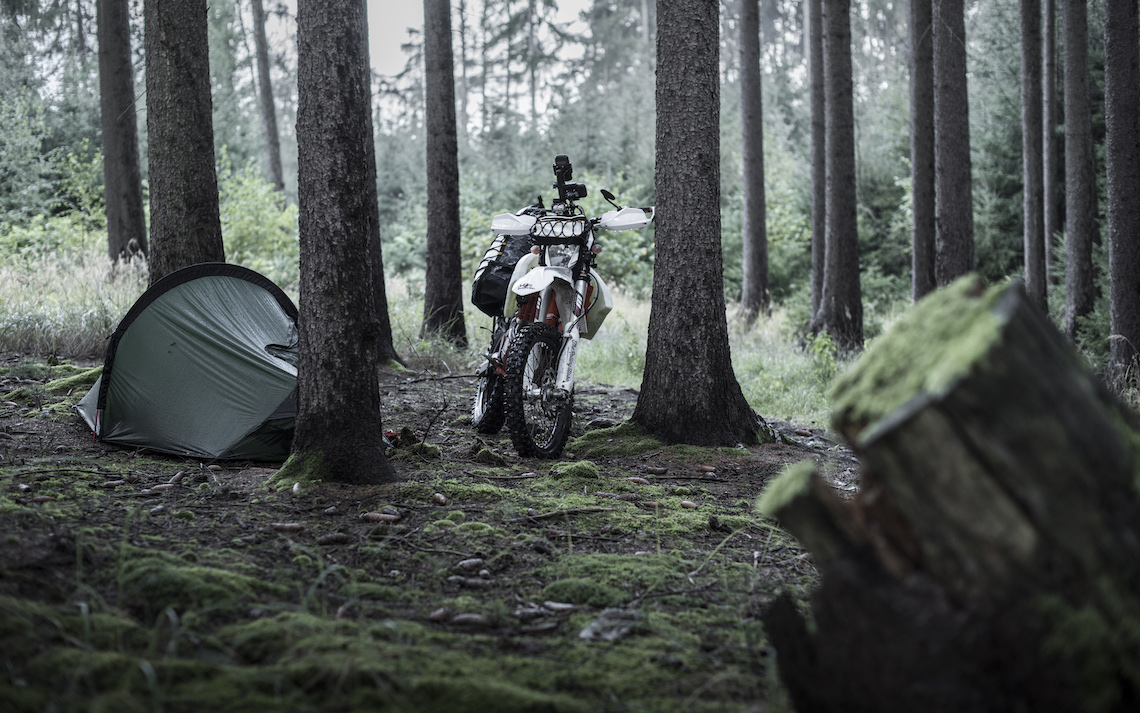
I currently run with two 15-litre XCountry Hobo version panniers and a 3.4-litre XCountry Hobo version mask bag. The 33.4-litre luggage volume is plenty for me. The Polish-made XCountry panniers are sturdy, light, waterproof and quick to open and close. They are also easily expandable with the handy zigzag bungees on the outside. The XCountry panniers mount without a rack, but need a tail mounting point.
I bolted some D-rings right on the tail fender with large diameter washers, and so far they’ve been holding nicely. In the front, the panniers are strapped right onto the frame. However, they seemed to swing a bit too much to my liking, so I fitted an extra D-ring on the bottom of the number shields on the bike and run a strap from there to the top of the subframe. They’re now stable enough.
The tail of the bike can be easily moved around from the luggage straps or just by grabbing the tail, so I only fit a haul loop in the front. It’s a ghetto edition, made from 25mm webbing and some hardware. It does what it’s supposed to and tucks away nicely behind the headlight mask.
Keeping Rolling
During its first season in 2016, the bike saw 120 hours of action over almost 500 miles. It had no issues whatsoever and performed flawlessly. This summer it will be pushed further, with a two to three-month expedition around the dirt trails of Eastern Europe.
It will be interesting to see how it does and which issues, if any, arise. I believe copious preventive maintenance, frequent service and the right set of spare parts will improve the chances of a successful expedition considerably.
My philosophy with all gear is to be self-sufficient, ride as light as possible and bring only the bare necessities. The real question, however, is how to define “necessities”. Unsurprisingly, the answers are as diverse as the riders. For me, a necessity is a piece of equipment that needs to be on board to ensure the continuation of the ride in the event of a failure.
This applies rigidly to all tools and spare parts. So a spare fuel pump, throttle cables and e.g. a shifter pedal are necessities, but a spare headlight bulb or a brake pedal aren’t. However, the likelihood of a specific catastrophic malfunction also plays into the equation of defining a necessity.
The probability of a fuel pump failure crosses the line but a cracked cylinder head doesn’t, so only the former is carried. The definition of necessities dictates which spare parts are carried, which in turn specifies which tools are needed.
The spare parts and tools are plentiful and heavy though, so I do my best to keep everything else as light as possible. Confidence in the bike and having a solution to potential problems is far more important than a stick of deodorant or a camping pillow. Adventure enduro is an ascetic, but rewarding, way to see the world. It is the perfect discipline.