Often asked how he manages to capture striking on-motorcycle 360-degree photos, Timothy King gives us a quick how to on the fine art of taking action shots while you ride…
First of all, you will need a camera with a very wide angle of view, and personal preference is for a 360-degree camera, as this also lets you form your images into ‘tiny-planet’ photos, which are a unique, relatively new way to compose a photograph. As part of my job, I’ve tried many different 360-degree cameras, but my favourite for on-bike shots is the Ricoh Theta. It has bright, clear LEDs to let you know what it’s doing and is easy to operate (even when wearing motorcycle gloves). It’ll let you preset things on a smartphone if you want, but it works just as well by firing the shutter button for video or photo.

Other 360-degree cameras I’ve tried had me faffing around with smartphone based controls which don’t work so well with gloves on. I’ve also had problems, especially with Samsung’s Gear360, rendering images out of the camera in the provided software. The Ricoh Theta software offers settings I value like interval photography and the software has never had a problem rendering quickly either. All the 360-degree cameras I’ve tried have surprisingly good light retention and clarity of image for fixed lens cameras.
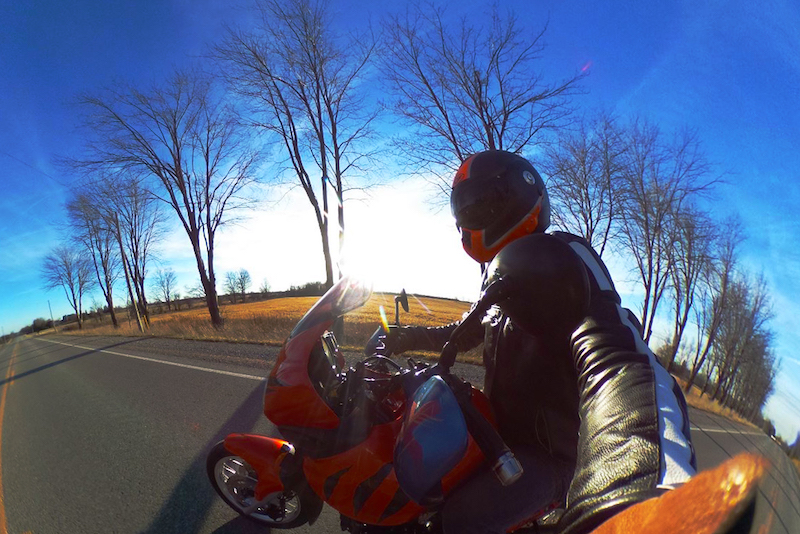
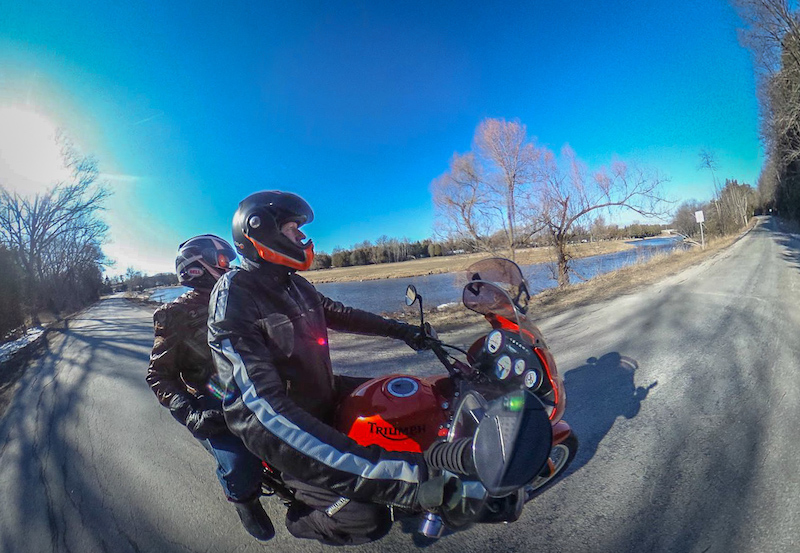
You might be able to get away with a 180-degree camera or something like a GoPro with a fish-eye lens, but the 360-degree camera offers that guarantee that you’ll catch everything. I started doing on-bike photos by firing the shutter using the big button on the Ricoh Theta, this produced some good on-bike shots, but you always end up with an arm in the photo holding the camera, and you look like you’re not focused purely on riding because you’re not.
There are some benefits to firing the shutter manually. You can time it to catch something interesting, you don’t have to focus or aim at anything because the camera catches it all for you, and you can make some interesting angles by holding it low over the pavement, overhead or anywhere else you’re flexible enough to reach. However, even with all that, you’ll still find you’ve got an arm in every shot, unless you’re really cunning with the cropping in post processing.
Last summer, I was testing a self-levelling gimbal for 360-degree video, and I managed to make a video under the most challenging circumstances I could devise (riding a motorbike). The gimbal did a good job of levelling things out when the bike went around corners and I liked the focused-on-riding look of the shots. This experiment got me thinking about a way of fixing a camera to the bike that would match the angles when it leaned over in a corner. I also wanted something that didn’t involve a camera right in front of me while I was riding.
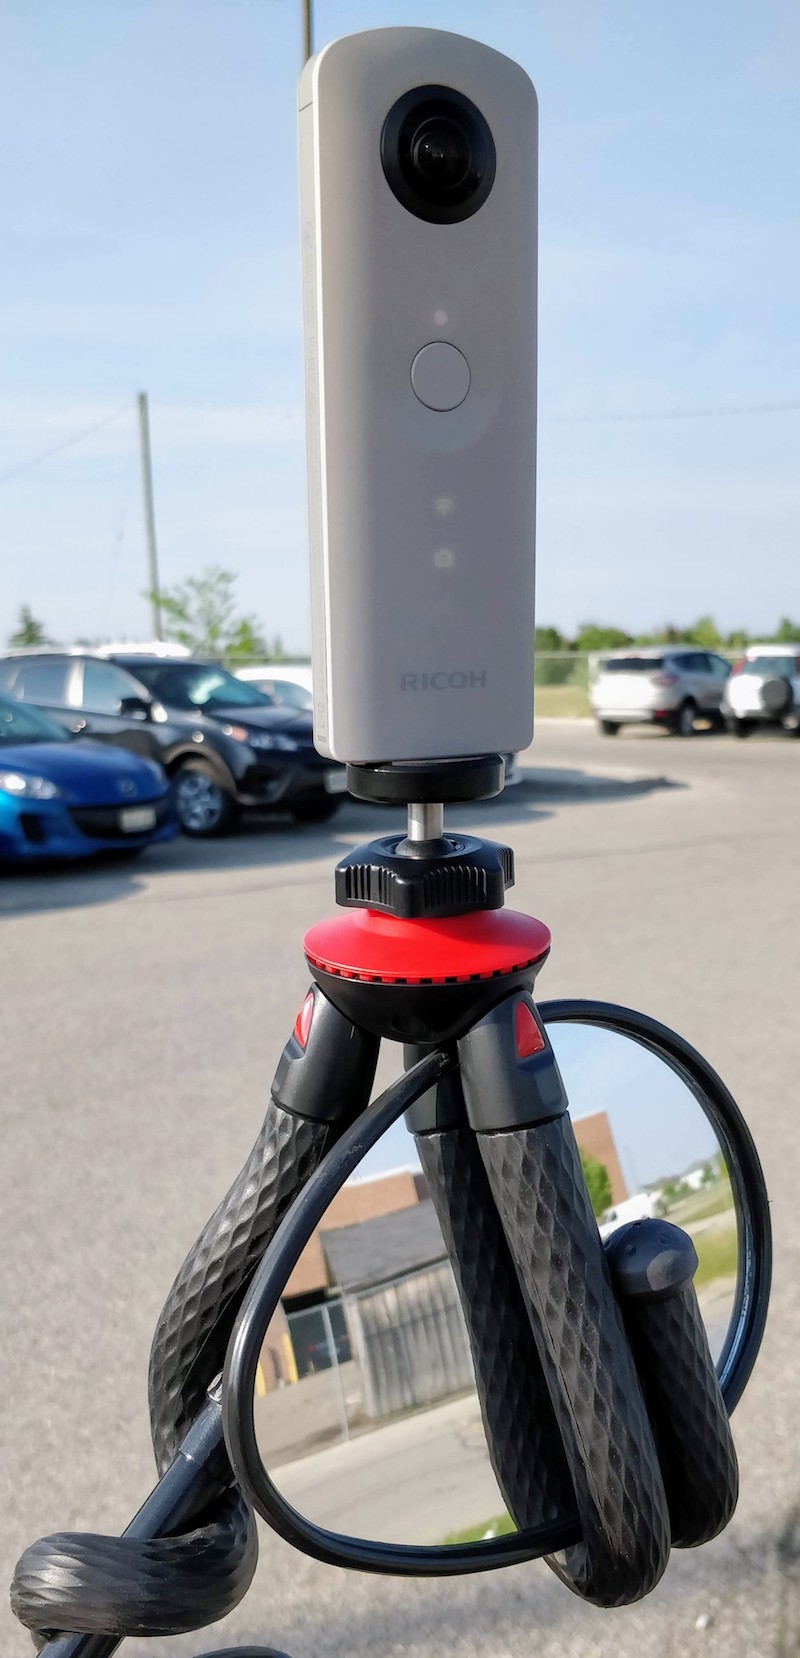
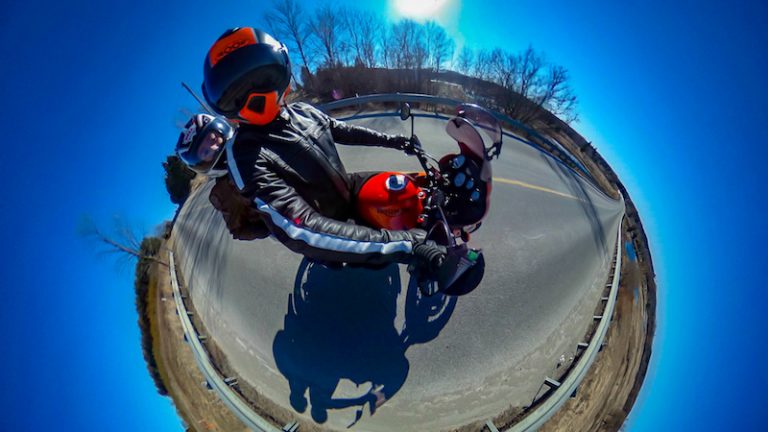
I finally settled on a gorilla-pod type flexible tripod. If your bike has raised rear view mirrors, they make the perfect mounting point for the camera. If you wrap the tripod around the wing mirror with some care, you can still use the mirror effectively. Flexible tripods have good stretch, so I’d recommend wrapping one of the arms right around the mirror’s arm to ensure it stays attached even if it comes loose. I pre-set the camera to take a photo on interval mode every 5-10 seconds and then forget about it. When I got back from my ride, I pulled the images into the 360 software, which takes the raw image data and lets you move around within the photo to frame the part you’re looking for. The shots you end up getting are great, as they look like they were taken from a drone flying along next to you.
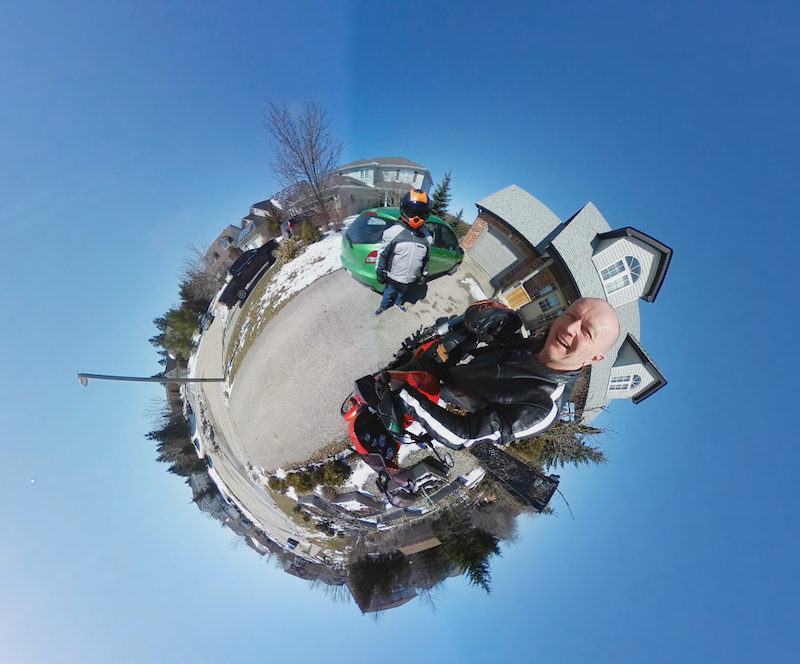
You can play with the geometry of 360 photos and video in a number of interesting ways. One of the most popular is the little planet shot where the image is distorted to make the ground a circle in the centre of the photo. The Theta software does this if you put your photos onto the Theta360 website with the click of a button. Here are some tiny planet images:
It’s digital photography, so don’t be tentative. Try different things, fire a lot of shots and only keep the good stuff. With a bit of practice, you’ll be producing amazing looking on-bike shots that’ll have people asking you, “how’d you do that?”. Here is the above in bullet point form (in case you’re a millennial who doesn’t read long form text):
1. Get yourself a quality Gorilla Pod type tripod. I use this one I got from Amazon, but I’d suggest going up market a bit – this thing is a plastic piece of crap.
2. Wrap it around one of your rear view mirrors.
3. I loop one tripod leg right around the mirror arm, so there is no chance of losing the camera (I learned that the hard way).
4. I prefer the Ricoh Theta because it has physical buttons that are easily usable even with gloves on, it has clearly visible LEDs and modes, it has superior software for video and photo editing, including built in tiny planet settings and it never crashes or renders pixelated (like Samsung software), and it’s aerodynamic and much lighter than alternatives.
5. Set the camera to video or interval photo-shooting, start it up and forget about it.
6. When you get back download the videos or photos and check out what you caught.
7. When you use the software you can look around within each photo and video and compose photos and video based on the bit you want to see.
Who’s Writing?
Timothy King documents his thoughts and experiences of life in the wind on his motorcycle, on his blog. To check out more from him, head over to the Tim’s Motorcycle Diaries website.