It doesn’t need to be big, shiny or posh, says Greg Baker, just as long as you’ve got the gear to get you up and running again
There’s no definitive ‘best toolkit’, or even an ideal toolkit. In fact the only toolkit you will ever be really interested in is the one you’re carrying when you need it – what goes into it is up to you!
Part of the joy of adventure motorcycling is the thrill of the unknown, the challenge attached to problem-solving and the risk attached to what you’re doing. How does a toolkit fit into all of this? Simple – it’s the one element of your travelling kit that enables you to solve problems and overcome mechanical obstacles. With a little thought you can create a toolkit that is comprehensive enough to deal with most problems you are likely to face, yet small and compact enough to carry and stow easily. The first mistake that almost everyone makes, however, is to take too much stuff: we’ve all done it and we’ve probably all taken tools that never saw the light of day on our journeys! If you follow a few basic rules you can build a toolkit that will get you out of most of the trouble you’re likely to encounter.
Rule 1: Don’t take what you don’t need
It’s all too easy to tell yourself you’re taking something ‘just in case’, but you’ll simply end up taking too many things. Look at your bike, look at your tools. The socket ABR Christian Anderson in action set you have bought for the trip has a nice case to keep everything tidy, but do you really need an 11mm socket? By looking at your bike and checking the fasteners it uses you can see what tools you might need, and you can leave the tools behind that won’t fit anything.

Rule 2: Keep it small, keep it light
There are very few fasteners on a motorcycle that need high torque values to fasten them properly. Check in your manual for the various torque settings for an idea of the numbers involved. The two biggest that spring to mind are perhaps the rear wheel axle nut and the clutch basket nut. You have a lovely half-inch drive socket set at home, capable of handling more torque than you can apply, but it will be bulky and it will be heavy. A good-quality 3⁄8-inch drive wrench will be able to handle almost as much torque as a half-inch drive, and certainly as much as most motorcycle applications will need. For example, the Teng 3⁄8th driver featured in the toolkit can handle more than twice as much torque as the 100Nm that is required to fasten the rear axle nut on most motorcycles; although in extreme circumstances you might need to use an extension tube on the handle to get the extra leverage required.
Rule 3: Make a tool do more than one job
Use a socket drive adaptor to allow you to use half-inch sockets with a 3⁄8th wrench. Some tools are purpose-designed to serve two functions, an ideal example of this being the combo tyre lever – a high-strength 7075 T6 aluminium alloy lever with a tyre spoon on one end and a hex wrench on the other. Various wrench sizes are available – an ideal combination is the rear axle nut size – and attachments can be used to transform it into a socket driver too. The other obligatory tool to carry must be a multi-tool such as a Leatherman or Gerber. These pack a huge variety of tools into one very compact package. The Leatherman Surge, for example, has some 22 tool functions which can be further extended by the addition of various adaptors. Quality has to be an issue to consider here, as these tools will give a lifetime’s service if looked after and used properly.
Rule 4: Evaluate the risk, then prioritise your toolkit accordingly
If you know your bike well enough, then you’ll also have an idea of its potential weaknesses or areas of high maintenance need. Being aware of these factors also helps in the decision-making process for taking the appropriate tools – for example, if you know you’ll be riding a lot of miles on rough surfaces or other rocky terrain, a puncture repair kit is essential. Some bikes have known weaknesses: immobilisation antennas or wheel bearings for example. If you know there’s a higher- than-average chance of a problem, be sure to take appropriate spares and the tools needed to fit them.
Diagnostic tools
CAN-bus, like it or not, is a growing technology and is to be found in all high-end adventure bikes currently available. While this technology brings a flexibility and sophistication beyond the capacity of conventional hard-wired electrical control systems, it also means that fault-finding is a lot more difficult as the computer-controlled ‘brain’ will more often than not simply shut the whole bike down.
The computerised control systems found on many modern cars and motorcycles these days are extremely complex and require sophisticated equipment to use them effectively. Using a full diagnostic computer is a skilful task, requiring not only the hardware but also the software needed to read and interpret the fault codes, and ultimately reset the system or component to function within its required parameters. The complexity of these systems is advancing constantly, with the most current systems being able to download bike-specific data on to a central database. This degree of connectivity allows vast amounts of information to be stored and will let any networked dealer access the bike’s history, identifying all service operations and upgrade or recall work conducted.
Thankfully, a simplified device for reading the fault codes stored in the bike’s memory is available at a fraction of the cost. Known as a ‘code reader’, it allows the user to interrogate the diagnostic system to see what fault codes have been flagged and which system has been compromised by any failed component. Model-specific readers will also display real-time data, and allow certain components and systems to be tested in isolation, as well as identifying any anomalous readings which might generally indicate an imminent failure. Their real benefit will come if ever a component fails while travelling, and using one to interrogate the system will allow the user to identify the problem rapidly and, if necessary, make arrangements for replacement components to be ordered and shipped.
Most Japanese motorcycles can display fault codes on their dashboard if a ‘service plug’ is connected to the diagnostic socket. The same result can very often also be achieved by ‘jumping’ specific terminals of the diagnostic socket with a wire link, although you must be sure that you know which terminals to connect. The resulting codes can be shown as a number in the display panel, or occasionally a sequence of warning light flashes. Interpreting these codes can sometimes be difficult, but a little web-based research will usually reveal the answer.
Spares
There will always be a few key items that will be essential to pack, although it will always be difficult to predict what you’ll need. Try to keep whatever you take to a minimum, certainly only taking those items that you know might or will be difficult to source in the area where you’ll be travelling, but remember that smaller items such as spare brake pads and wheel bearings take up no room at all in your luggage. Research your route, identifying points on the way where you can access garage services or dealer facilities. Check with the various owners’ groups to research your bike’s weak points and use that knowledge as part of the preparation process to replace items that have a history of failure, or those which will wear out before your return. Thankfully catastrophic mechanical failures are relatively rare these days, especially if you are diligent with your service schedules, but smaller items such as control cables are always at risk. Buy replacements for your key cables, and fit them before you leave, but leave the ‘old’ ones in situ. That way you know for sure that the spare works (because you’ve already fitted it) and you also have a guaranteed suitable replacement already in place (the ‘old’ one) in the event of the new ones failing.
Spare bulbs for your main lights are essential, and are a legal requirement in some countries. Keep a set in your electrical toolkit, along with a selection of fuses. One of the most vital spares to take is a duplicate ignition key. Surprisingly, many motorcycle travellers leave home with just one key, but in this day and age of hyper-sophisticated alarms and immobilisers, if you lose yours it is very unlikely that you’ll ever get the bike running without it. There are suitable hidey-holes on every bike that can be used to stow a spare key – you just need to remember where you put it!
When securing a spare key, make sure it’s not going to become dislodged, or fall out easily. Don’t chose an obvious place like under the seat, or behind the number plate, or secure it to anything that might become detached from the bike, like a rear mudguard, for example. Ideally, it should be in its own small waterproof container, one that can be either zip-tied or fixed to the bike’s bodywork.
Self-preservation
There will always be the rare occasion when you break down and are unable to make any progress at all. In these situations, never leave your motorcycle. You and it are far more visible together. While it might seem that you’re in the middle of a wilderness, the reality is that you’re quite likely to see someone coming along the road before too long. Don’t be afraid to be assertive when trying to get them to stop, although once they see your plight most fellow travellers will be more than happy to help. Hitch a ride to the nearest town, and you’ll probably find that your travelling friend will help you here too, in seeking recovery and repair of the bike. Most mechanics in remote areas have learned how to keep almost any vehicle running and they might well be able to offer a solution. At worst you’ll be able to find a phone and call home for spares to be freighted to you.
The Adventure Motorcycle Maintenance Manual is available from all good bookshops and direct from Haynes at www. haynes.co.uk or call 01963 442030, priced £21.99
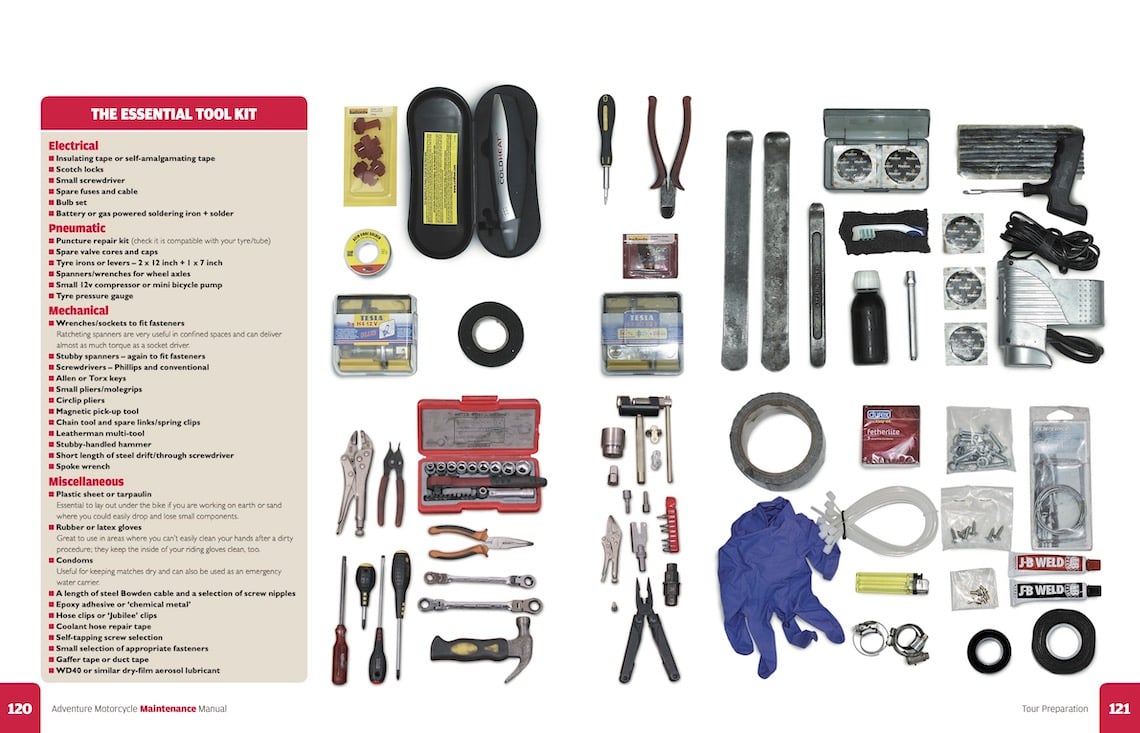
The Essential Toolkit
Electrical
■ Insulating tape or self-amalgamating tape
■ Scotch locks
■ Small screwdriver
■ Spare fuses and cable
■ Bulb set
■ Battery-or gas-powered soldering iron + solder
Pneumatic
■ Puncture repair kit (check it is compatible with your tyre/tube)
■ Spare valve cores and caps
■ Tyre irons or levers – 2 x 12 inch + 1 x x 7 inch
■ Spanners/wrenches for wheel axles
■ Small 12v compressor or mini bicycle pump
■ Tyre pressure gauge
Mechanical
■ Wrenches/sockets to fit fasteners
■ Ratcheting spanners are very useful in confined spaces and can deliver almost as much torque as a socket driver
■ Stubby spanners – again to fit fasteners
■ Screwdrivers – Phillips and conventional
■ Allen or Torx keys
■ Small pliers/molegrips
■ Circlip pliers
■ Magnetic pick-up tool
■ Chain tool and spare links/spring clips
■ Leatherman multi-tool
■ Stubby-handled hammer
■ Short length of steel drift/through screwdriver
■ Spoke wrench
Miscellaneous
■ Plastic sheet or tarpaulin, essential to lay out under the bike if you are working on earth or sand where you could easily drop and lose small components
■ Rubber or latex gloves: Great to use in areas where you can’t easily clean your hands after a dirty procedure; they keep the inside of your riding gloves clean, too
■ Condoms, useful for keeping matches dry and can also be used as an emergency water carrier.
■ A length of steel Bowden cable and a selection of screw nipples
■ Epoxy adhesive or ‘chemical metal’
■ Hose clips or ‘Jubilee’ clips
■ Coolant hose repair tape Self-tapping screw selection
■ Small selection of appropriate fasteners
■ Gaffer tape or duct tape
■ WD40 or similar dry-film aerosol lubricant