

If you’re looking to take your photography to the next level, learning how to correctly set your camera’s aperture is a handy skill to know. Here, Simon Thomas explains how he captures great images using this technique
Let’s get back to basics. Amongst the most discussed and the most misunderstood aspects of photography is ‘aperture’ or f-stops as the photo experts like to blurt out. I’ve used both these phrases over the last few years in most of the articles I’ve written, but in this piece, I want to focus on and hopefully share once and for all, what this camera setting does. And, more importantly how it will dramatically affect your images.
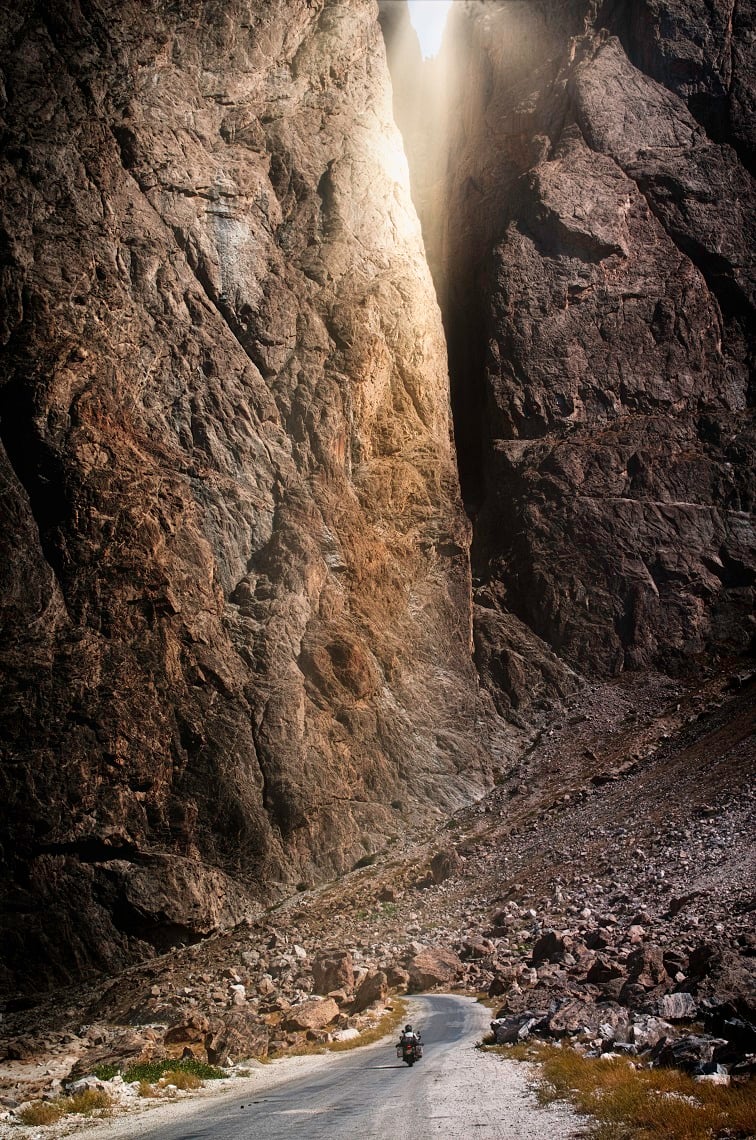
Mountain in Tajikistan
Aperture is simply a term that refers to the diameter of the hole inside your lens. When we, as the user, or the camera makes a change in aperture, this alters the size of the hole, which in turn lets in more, or less, light into your camera. It works the same way as the pupil of your eye. The wider the pupil, the more light is let in, and the narrower it is, the less light. Simple right? Not quite.
Choosing a wide aperture may be great for shooting in low light conditions, like around the campfire at night, but the size of your aperture also effects depth of field (how much of the image is in focus) and a wide aperture will give you a very shallow depth of field. Not great if you’re photographing your mate as he or she rides through a vast, dramatic landscape as it’s more than likely that the distant background or the near foreground will be out of focus.
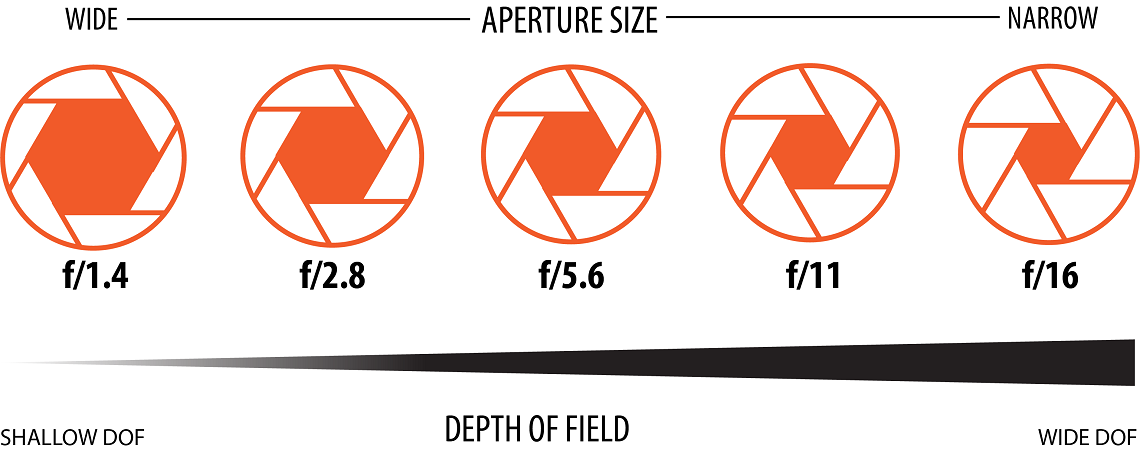
To make things even more complicated, the aperture is described in photo speak as an ‘f-stop scale’. If you can memorise the scale, your photographing will improve massively. Yeah, I know, it’s not exciting, just necessary. An image speaks a thousand words, so a graphic I’ve created should help.
Does that make sense? Great. As a photographer, I use all the settings available on my camera, but when I decided to take control of my images and I turned off the dreaded ‘auto mode’, the first setting I used, and still do today, was the ‘A’ or aperture mode.
As a photographer, one of the first things we should be deciding on is what the focus of the shot is, and what should and shouldn’t be in focus. Yep, intentionally choosing to make parts of the image out of focus and slightly blurred is one of the techniques we can use to push the viewer’s eye to what we really want them to look at.
When photographing a person, I normally want their eyes and face in focus and with lots of detail, and I like to have the background a little out of focus, so I’ll choose an aperture of f5.6 or below. But, when I’m photographing Lisa riding into a huge expansive landscape like the Mongolian Steppe, then I want her, her bike and the whole landscape in super sharp focus, in which case, I’ll select f8 or above. So, find your camera’s ‘A’ mode and choose it.
In this mode you’re going to select the ‘aperture size’ (how big the hole in your lens is) and the camera will do all the other complicated stuff in the background. Remember, if you want a wide depth of field, meaning you want the foreground, centre and background in focus, then choose an f stop like f8 or above. But if you want your subject in focus and other parts of the photo (normally background or foreground) out of focus, then, yep, you guessed it, select an aperture like f5.6 or below.
Top Tip
Remember though, the lower the f-number the shallower the depth of field which means you have to be more accurate about getting your main subject in focus. If you’re shooting an image with a high f-number like f11 or above in low light conditions, it’s a great idea to use a tripod, especially if the aperture you’ve chosen forces the lens to stay open for longer than one second.
So, switch to Aperture mode on your camera, take control and get creative. Have fun and make sure you share your results with us at www.facebook.com/2ridetheworld.